
Everyone needs a place for their Classic Whiskeys and what better place than a Barrel Stave Shelf You Can Make? Let me start by saying that this is NOT a 30 Minute Project. You will find that several steps are time consuming, painstaking, and frustrating. But, it will be worth it in the end. You will find links below to tools and material you can explore and a sketch of the completed project. Hope you give this a try and you enjoy making it.
And follow this link to my Video to see how it is done. VIDEO LINK
Tools & Materials
First, there are no special tools needed for this project. Though I did use a pull saw, chisel, and a mallet to create landing pads for the shelves and the front rail rails. You will also need a drill to counterbore your screws and drill the through drill. I use a 7/16” counterbore and a 3/16” through hole bit which fit the 1-1/2” Trim Screws I used. The cleaning step requires a scraper and a wire brush as well as a compressor and blowgun. Links to some of these are at the bottom.

General materials are bourbon barrel staves and a few pieces of oak for the shelves. More specifically you will need to buy two staves 4-1/2” to 5” wide two that are about 3” and two more that are 1-1/2” to 2” wide. You can get these from Skull Creek Designs in Midland Michigan (Link Below). You will need and additional 108” of Oak 1×8.

Material Clean-up & Prep
Scraping
The first step in creating a barrel stave shelf is material clean-up. You will need to scrub off the char from the inside surface using a paint scraper and wire brush. The objective is to knock off all the heavy char and get down to the wood. You are not trying to take off the color just the chunky loose carbon bits. When you are done you have a really nice deep chocolate colored surface.

Dusting
Next, use your compressor and blowgun to blow all the carbon dust out of the grain. This will help the varnish to adhere to the surface.

Sealing
Last step in preparing the staves is to seal them with a coat of varnish or sealer. This will lock in all of the remaining char and generally keep you hand and bench clean (ish). So apply a thin coat over the inside surfaces and let it dry for a couple of hours.

Initial Sanding
At this point give the outside of the staves a light sanding with 80 grit in an orbital sander. You just want to knock off the dirt on outside surface and leave most of the patina. We will hit it later with 220 grit to finish up the project.
Layout
Start with a test layout of your barrel parts. Literally lay them out on the bench just as you envision your shelf. The sketch below is for mine using my materials. Your materials may be slightly different sizes so you may have to adjust dimensions suit. You will be doing this kind of a layout several times during tis build.

Set the middle staves so that they overhang about 1” to 1-1/2” on each side. Then lay on the top and bottom staves with approximately equal overhangs. Measure the inside length of all three shelves. The top and bottom shelves should be the same length.

Cutting
Next you need to cut your shelves to the lengths you measured. Be as accurate a possible because the shelves will be your registration point for squaring the assembly.

Fitting the Shelve to the Sides
The objective here is to create shallow dados for the shelves. You need to locate all three shelves in position and get the assembly generally squared and clamped. Then you need to mark the position of each shelf. Use a Sharp marking knife or an Xacto Knife. There is a link below to my Gerber knife. Next saw along the lines with a thin kerf saw. Saw to a depth about 1/32” deeper than the char. Secure work piece firmly then chisel out the waste between the saw cuts. You are chiseling through well seasoned white oak so you will need a mallet – that stuff is hard!! When the chiseling is done you want a flat clean surface that will mate to your shelf edge. Repeat this step for the other five spots working left to right and test fit as you complete each set. Just to ensure you are completing it correctly. When you’ve completed all six, then dry fit the assembly and clamp it together to make sure everything is level and square.

Fitting the Front rails
With everything clamped up in the correct position, lay on the stave in the pattern you want. Be sure you have an equal overhang on each one (they may be slightly different lengths). Again, using a knife mark where each front rail stave intersects the side stave and note the angle. With everything marked, grab your saw and cut on the line to a depth of 1/32” below the char. This will give you an oddly angled cut by the way. Chisel out the waste and dry fit continually to make sure you have solid contact.

Marking the shelves
Your shelves should be sticking out from the front rail staves. You will need to mark the shelf to match the curve of the front rail barrel stave. Do this by selecting the stave then positioning it and strike a line following the inside of the stave. All staves are different so put a label on each one with its position noted.

For the middle shelf – I put in a display gallery to fit eight Blanton’s Whiskey corks. I did that by adding 2-3/4” to the width of the middle shelf. Then I marked the Front rail, measure out 2-3/4” at the ends and the center. I placed the front rail on those marks and drew a line along the outside.
Marking and Drilling the Screw Holes
With everything clamped up now is the time to mark your holes for the screws. As you will be filling these screw hole it is not super critical to get them perfectly aligned but do try to have them close. I suggest three in the end of each shelf and one at each end in each front rail stave. You will also be putting one in through the center of the top and bottom front rail into the front edge of the shelf.
Drilling the holes is straight forward. Snag a Gimlet or a Birdcage Awl and sink a starter for each hole mark. My finish screws required a 7/16” Counterbore and a 3/16” bore. First, flag your 7/17” Bit at about 3/8” to 5/16”. Flagging is nothing more than wrapping a bit of tape around the bit leaving 3/8” of the bit exposed and leaving a “flag” of tape sticking out. It allows you to drill pretty consistent holes. Drill all of the counterbore holes. Next, swap to a 3/16” bit and drill the through holes. The bottom of the counterbore hole provides the center for the 3/16” bit.
Cutting and Fairing the Shelves to Fit the Front Rails
Next we need to cut the shelves to fit the staves. All three shelves are marked with a curve that should match the mating stave. I used a 3/8” blade in my 14” Delta bandsaw to make these cuts. You could use a jigsaw if needed but it will take more work to smooth the edge. I left about 1/32” from the line so I cut really close. I did not have much material to remove to get down to the line and my saw cut was very smooth. So all I had to do was a bit of sanding on the oscillating belt sander. You may need to use a block plane, scraper, and file to fair your curve to the line.

Drilling the Gallery Holes
Now we need to put in the gallery holes, As this is intended to display Blanton’s corks there needs to be eight evenly spaced 7/8” holes (you could go with 15/16”). I set my end holes in 3” in from each end then placed the rest evenly distributed. It took a bit to get the right distribution spacing which for me was about 3-1/4” between holes. I worked inward from each end toward the center so that the center could be a bit more (or less) if needed.

After drilling (with a solid backer) I routed the top and bottom edges with a 1/8” round over bit just to help on insertion of the corks.
Sanding
With all this done we are ready for final sanding. All outside surfaces got a quick sanding with 220 grit and the shelves were sanded too.
NOTE: I took my card scraper and scraped the char off a 3/4” wide band on the bottom edge of both the top and bottom rail to improve the glue joint between the shelf edge and front rail.
Assembly
Assembling the barrel stave shelf is straight forward. Apply glue to the dados in the sides and slide in the shelves, then square and clamp the assembly. Then drive in your trim screws.

Assembly Tip: Make sure the tip of your bit is long enough to reach into the bottom of the counterbore.
Next, glue and screw the front rails in place to the sides. Apply glue to all the contact points. The top and bottom shelves will be screwed through the front rails at the center. And the center shelf should be screwed up through the bottom into the front rail.
Assembly Tip: Be sure to wipe off any glue squeeze out.

Plugging the Holes
The last step in the assembly process is to plug all of the counterbore holes. The easiest way to do this is to cut several 1/4”x 1/4” Oak strips about 6” to 10” long. Then use your knife or chisel to whittle them into a taper to about 7/16”. You want it to be a tight fit and remember you are only going in 3/8 inch. For each hole, add a dab of glue and drive the plug in until you here a different sound. When you hit bottom the sound changes and it is obvious. I used a flush cut saw with a business card under it to keep from marring the wood. Then used a sharp chisel to pare the remains of the plug flush with the surface. And finally, I hit it with a very light sanding using 220 grit sandpaper.

Finishing
Wow, that was a lot of work, but we have reached the finishing stage. At this point you can apply your choice of stain and finish. I used Minwax Dark Walnut stain to give to an aged antique look. The I applied three coats of a of Varathane satin polyurethane.

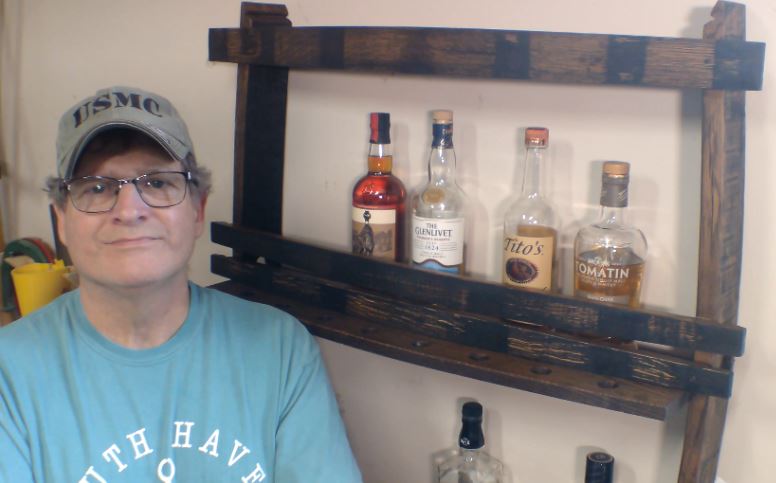
Sweet – this barrel stave shelf project is complete and I’m really happy with how it turned out!! It did take a bit more than 30 Minutes and I did put in chunks of time longer than 30 minutes. Usually about an hour or two with the longest segments around chiseling the dados (that white oak is hard). And yes, I did give it a try in my shop wall.

Thanks for reading and until next time Good Making!
Bill
Bourbon/Whiskey Shelf Video https://youtu.be/ggMIH50ggAY
DIY Cigar and Whiskey Butler Video https://youtu.be/PR0C5dOrO2E
Barrel Stave Bottle Opener Blog https://30minutewoodshop.com/barrel-stave-bottle-opener/
Easy DIY Whisky and Cigar Butler https://30minutewoodshop.com/easy-diy-whisky-and-cigar-butler/
Tools and Materials you may need
Barrel parts at Skull Creek Designs https://www.etsy.com/shop/SkullCreekDesigns
BOSTITCH Air Compressor Combo Kit https://amzn.to/3C9bZ8i
SUIZAN Japanese Flush Cut Saw https://amzn.to/3CphEav
PORTER-CABLE Random Orbit Sander https://amzn.to/3QJQn6d
Air Blow Gun with Adjustable Nozzle https://amzn.to/3qeG4Mx