
So let’s make a Dice Tower. This is a really easy project, fun to make, easy to build, and will be a ton of fun for your next D&D or Warhammer 40K game over the weekend. You really only need a few tools and simple materials so let’s get started.
Tools and Materials
The Dice Tower can be made with only hand tools. The tools you really need for this project are a saw, a tape measure, a combination square, a few 6” clamps, and some sandpaper. I, of course, will be using a radial arm saw and an orbital sander. Oh and a Glowforge Pro Laser too. OK you don’t really need the glow forge but if you have one it’s fun to use.

Materials are equally simple. I chose to use Poplar for this project because the pieces I had have a nice color and pattern. The Dice Tower would look really good in Paduk or quilted maple. You will need two pieces that are about 19 inches long by 3/4 by 1 inch and several dowels 3/8 inch diameter by 36 inches long.

Layout
As with the tools and materials layout is very straightforward and mostly just cutting the parts to size.

Cutting
The first you’re going to want to do is cut your back front and sides to the appropriate width then come back and crosscut. The front and back will be 4 inches wide and the sides will be 2 1/2 inches wide. You can adjust these dimensions based on the wood you have on hand. Start by setting your fence on the table saw to 4 inches and rip off several pieces. Next reset the saw fence to 2 1/2 inches and cut several more pieces. You still need one more piece that’s 3 1/2 inches wide. This is for the tumble ramps.
With everything size to width crosscut to the appropriate dimensions noted in the drawing. That would be 7 1/2 inches for the back six and 3/8 for the front both of which are 4 inches wide. And then cut the sides at 7 1/2 inches. Tumble ramps are pretty straightforward you’ll cut 3 that are 1 1/2 inches wide and then you’ll cut one more at 2 3/4.

LASER Etching/Engraving
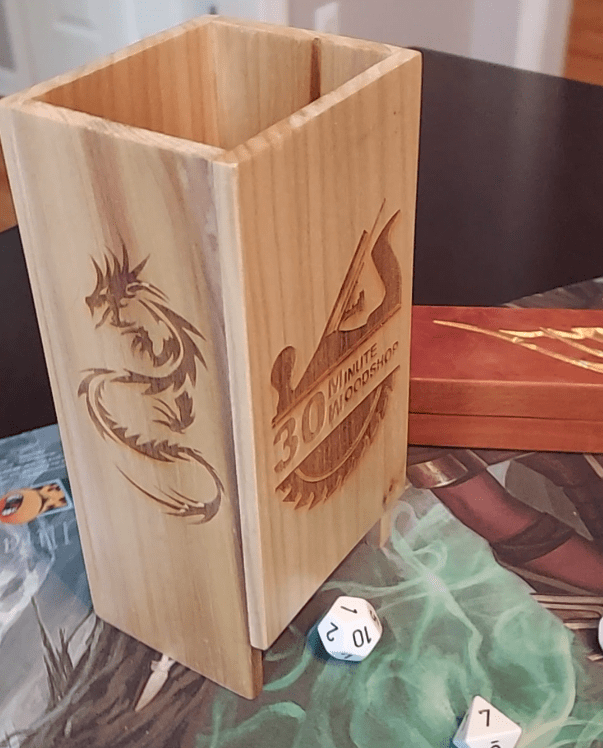
Laser etching designs on the pieces is not necessary but it certainly is fun. I happen to have a glow forge pro most of you folks probably don’t have a laser. But you can go to your local makerspace or library and they may have one that you can use. Usually this is at low cost or no cost. You will have to learn how to do some work with the software however. What you have that it’s simply a matter of putting the wood into the machine and getting it started. I had a lot of fun creating the designs in Inkscape.
If you don’t have or have access to a laser you could use a small CNC again usually found at the local makerspace or library. Using these will be very similar to a laser in many respects. And you have to learn the software. Other alternatives of course are you could hand paint hand design or have someone you know put something on.

Sanding
Sand all the surfaces with 320 grit sandpaper either by hand or with an orbital sander. Be sure you break all the sharp edges. Use 320 grit on the dowels and sand the ends. This will provide a nice surface to receive the finish.
There is one specialty sanding item you need to do and that is to send the bevels on the tumble ramps. These are pretty simple to do just use 220 grit sandpaper hold the Sander at about 30° for about 20 seconds and you’ll have your bevel. The bevels are not critical and you may choose to not even put them on but they add additional glue surface that will hold everything together.
Assembly
Before you get started on the assembly process there is one thing you really need to do. It is not shown in the video but you need to apply some pieces of felt to each tumble ramp. Without the felt on the tumble ramps it can be very noisy. I suggest using 3M spray adhesive and then simply press on felt. Make it a bit oversized and then trim to fit after the glue dries which only takes a few minutes.
Dice tower project relies on glue only to hold everything together. So accurate assembly is very important. The assembly process can be a bit of a pain because you have to hold multiple parts in position. I found the easiest way to do that is to start at the bottom tumble ramp and work upwards. Gluing the sides and the bottom tumble ramp in gives you a good base to work from. And you can slide pieces in with glue very easily.
NOTE: Be sure you follow the directions of the tumble ramps noted on the drawing you don’t want to get these in backwards.
With all the tumble ramps positioned, the last step is put on the front. That’s merely applying glue to the exposed surfaces of both tumble ramps and edges. Gently clamp the assembly together. It really doesn’t take much pressure you’re just trying to hold everything in position and in alignment. Give it about two to three hours to dry and you’re ready to go.

Finishing
With the Dice Tower assembled and the glue dry apply the finish of your choice. I use a Clear Lacquer spray and applied 4 coats. I followed each coat with a light sanding with 320 Grit and applied a light paste wax as a final finish. After each sanding if you have engraved the surface be sure you blow all the sanding dust out of the engraved areas. Also, don’t put too much wax in the engraved areas either.

With the finish on the project is done. It’s a great little project that doesn’t take too much time, materials, or tools to complete. And it will provide hours of fun at your next D&D or Warhammer 40K game night.

Hope you got something out of this and if you did, do me a favor, hit like and subscribe. I’d appreciate that a lot.
Thanks for reading and until next time Good Making!
Bill
Visit my Etsy Store at www.etsy.com/shop/30MinuteWoodshop
Facebook https://www.facebook.com/30MinuteWoodshop
Links to my Videos and Blogs
Create Your Own Dice Vault https://30minutewoodshop.com/?p=1226
DIY Whiskey and Cigar Butler https://30minutewoodshop.com/?p=550
Farmhouse Key Rack https://youtu.be/I65FGq4dKYY
Tools and Materials you may need
DEWALT Drill and Driver Combo https://amzn.to/42yybmy
DEWALT Router Plunge Base Kit https://amzn.to/3LKkJEK
Starrett Combination Square https://amzn.to/3XpbrDN
Wixey Digital Angle Gauge https://amzn.to/3U5aUav
Wixey Digital Protractor https://amzn.to/490yoll
WoodRiver Low Angle Block Plane https://amzn.to/3pkNvos
Milwaukee M18 Jig Saw Kit https://amzn.to/3FAWXsS
BOSCH Compound Miter Saw https://amzn.to/421A1vl
Minwax Fast Drying Polyurethane https://amzn.to/3V5h0pO
PPE Gear
3M N95 PPE Mask https://amzn.to/3x4NGEu
ISOtunes Bluetooth Earmuffs https://amzn.to/3lpj1iA


