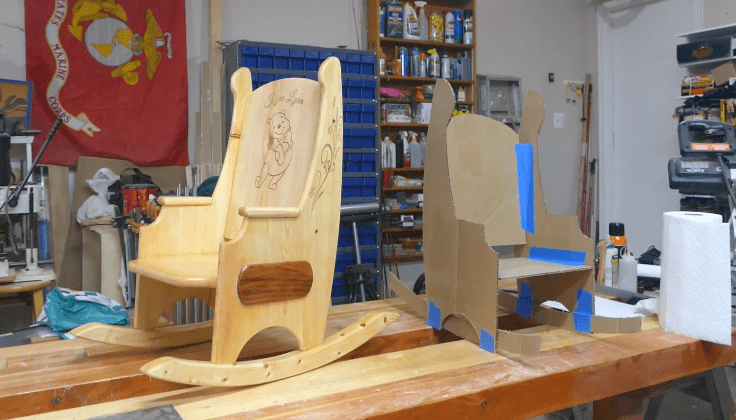

So here’s a project that’s really easy, though it will take you some time. It’s a child’s heirloom rocker. I saw this at an antique store and I decided by taking a picture that I would recreate it. To do that I actually built a mock up out of cardboard and then based a lot of the dimensions I had off the cardboard model.
Now, just to be clear, this is not a 30 minute project. It will take you several hours to do it and a lot of it for me was sanding. You could break it up to a lot of 30 minute pieces though.
So let’s get started.
Tools and Materials
The materials for this rocker are one single 1 X 12, eight feet long and a 2 X 4. The 2 X 4 is for the rockers.

As far as tools, while I used the bandsaw, you can easily do this with a jigsaw. And of course, you’ll need some layout tools.
Mockup
I would say if you’ve never built one of these before, it might be a good idea to give this all a try and make a cardboard mock up first just like I did. It will give you the confidence to mark and cut wood.

Your first steps are basically to layout the lengths of the parts and do some cross cutting because it’s very difficult to handle an 8 foot long board. Cutting into smaller size pieces makes it much easier to handle and much easier to work with.

Layout
You can see from the three sketches below there are a several of parts. Once you crosscut the Sides, the Back, and the Seat to size you can start doing the layout. The rockers will come later.


Layout for this project is very easy. All you have to do is follow the dimensioned sketch. The only tricky part are the curves, and for that you’ll have to make a fairing stick. Using a fairing stick to make the curves is very easy. All you do is take a thin strip, approximately 1/8 inch to 3/16th inch thick about 3/4 to 1 inch wide and about 3 feet long. What you’ll do is bend it like a bow and hold it with a string. This makes setting up the curves much easier. You just tighten or loosen the string to make the curve tighter or broader. Then match the ends and trace it.

As the US Marine, you occasionally hear me talk about a field expedient. Well, here’s a good field expedient for this particular project. Instead of using a compass and making an exact curves, pick up a paint can and just use that to actually create the curves as necessary. Smaller curves are of course made with a coffee cup.

Cutting
Now it’s time to start actually cutting the pieces out. I used the bandsaw, but you could easily use a jigsaw to do this. The first thing you want to do is you want to double face tape the two sides together. This allows you to cut identical curves. It also makes sanding later very easy. Follow the lines, but give yourself a good 1/16th of an inch So you can sand down to the line.

Sweetening the Lines with the Sander
With all the parts cut, you’ll need to sweeten the lines by sanding. I used an oscillating belt Sander, but you can use a regular orbital Sander, some files, and some sandpaper and do the same thing. The oscillating belt Sander, however, made this really fast and easy. For me it was well worth the $175 or even cheaper if you get it online through Facebook Marketplace. I use this tool all the time for almost all my projects. Just make sure that you have dust collection because it makes a lot of dust. Follow the edges and sand to the line and you’ll be good to go.

Edge Routing
This project is slated to be used by a small child, so you want to make sure all the edges are nice and soft, rounded, and there are no splinters or any other things that might catch on a child’s skin. To make sure that doesn’t happen, we’re going to route all the edges that are exposed. I used my router table with 3/8 inch roundover bit with a bearing and just followed all the edges to make sure everything was nice and smooth.

Dry Fitting
With all the hard work done, now it’s a good time to try a dry fit. Assemble all the pieces and hold them in place using clamps so that you can see how things are working and where you may need to make some adjustments. If you need to make adjustments to the parts, this is the perfect time to do it so you can get it back onto the saw or do some more sanding.
Once you have the pieces clamped and fitted properly, don’t take the clamps off yet. We still have more work to do.

Rocker Layout
Now is the time to start laying out your rockers. So grab a 2 by 4 and you’re faring stick Layout your measurements for length and thickness and then lay the fairing stick down and trace your curves. It really is just that easy.

Cutting, Sanding, and Routing the Rockers
With the layout done, take it over to the bandsaw or to your Jigsaw and cut to the curve. And now you’ll repeat the same sanding and routing tricks as you did on the sides.


Fitting the Rockers
All the parts are ready to go and now all you need to do is to fit the rockers. We’re doing it at this step so that we can disassemble and cut the bottom of the feet to match the curve of the rocker. You could try to do this once it’s all assembled, but that would be a true pain in the rear end.
So with your rockers cut, sanded and routed set the chair on top of the rockers. Move it forward and backward until it’s balanced. Be sure the rockers are even. Right to left, tip to tip. Now Look from the side and you’ll see there’s a gap. What you want to do is you want to mimic the curve and mark and cut off the excess material so that the bottom of the feet on the chair match the curve of the rocker.

More Sanding
The rockers are fit, so now it’s time for more sanding. We now have to hit all the flat surfaces and all the edges with 220 grit sandpaper just to make sure everything is nice and smooth. We don’t want any little fingers catching any splinters. So grab your orbital sander and sand everything. You can buzz through all the cutting and layout pretty quickly but this is one step that takes a fair amount of time to execute.

Assembly
Assembly of this thing is kind of tricky. It’s really made with a three handed monkey in mind. The easy way to do it is to start by creating and hot gluing two blocks that fit underneath to support the seat in place. Then the cut 2 block and hot glue those in place to hold the back in place. Doing this will make the whole assembly process way way far far much much easier and you can knock the out later.
Next, you’re going to go ahead and apply glue. To all the surfaces. On the edges of the seat. And the edges of the back. Set the seat and back in place and clamp everything together. With everything set in place and clamped. Drive 2 screws into the back from the sides on each side. And drive 3 screws into the seat from the sides on both sides. I used 2 inch finish screws. They’re small and unobtrusive and almost unnoticeable.

Attaching the rockers is pretty straightforward. Set the chair on the rockers and make sure that you find the correct balance point and the rockers are even left to right, tip to tip. Mark on the rockers where the seat legs go. Turn the whole assembly upside down, apply glue, and put the rockers on the feet. Next you’ll gently clamp those in place. Then drill and counter bore holes into the rockers at each of the legs. Drive a three inch deck screw into each leg.
OK, at this point you’re probably done. However what I did is I cut 2 small arms which are about an inch wide and about 6 inches long and tacked those on so I didn’t have a rough surface. Super easy to do so I highly recommend it.

Finishing
I threw on three coats of varnish for this particular project. That’s because I know it’s going to be used by a child and she will probably spill stuff on it. So this will be very easy to clean. You can use paint or anything else. I would stay away from, however, any kind of oil finishes or boiled in seed oil or those types of things because the child might decide to chew on it.
The Finished Project
Well, this is really a bit of a fun project. And I have to say, if you have a grandniece, grand nephew, grandchild, or your son or daughter I would absolutely recommend that you guys put something like this together. It’s an easy project and one that you can build fairly quickly, except for the sanding that requires some work. You can cut all the parts, do all the sanding routing, assembly of this heirloom rocker in a fairly short amount of time, and you’re going to have an heirloom piece that your niece, nephew, son or daughter would want for their kid. So keep that in mind, build it. If you want to do me a favor, drop it on my Facebook channel.

If you do make this project, congratulations on a job well done. And do me a favor and post it on my Facebook page (see link below).
Hope you got something out of this and if you did, do me a favor, hit like and subscribe. I’d appreciate that a lot.
Thanks for reading and until next time Good Making!
Bill
Visit my Etsy Store at www.etsy.com/shop/30MinuteWoodshop
Facebook https://www.facebook.com/30MinuteWoodshop
Links to my Videos and Blogs
Create Your Own Dice Vault https://30minutewoodshop.com/?p=1226
DIY Whiskey and Cigar Butler https://30minutewoodshop.com/?p=550
Farmhouse Key Rack https://youtu.be/I65FGq4dKYY
Create Your Own Lazy Susan https://30minutewoodshop.com/?p=491
Tools and Materials you may need
Ridgid Oscillating Belt Sander https://amzn.to/45C3rTK
Starrett Combination Square https://amzn.to/3XpbrDN
WoodRiver Low Angle Block Plane https://amzn.to/3pkNvos
Milwaukee M18 Jig Saw Kit https://amzn.to/3FAWXsS
BOSCH Compound Miter Saw https://amzn.to/421A1vl
Minwax Fast Drying Polyurethane https://amzn.to/3V5h0pO
PPE Gear
3M N95 PPE Mask https://amzn.to/3x4NGEu
ISOtunes Bluetooth Earmuffs https://amzn.to/3lpj1iA