
Kids LOVE puzzles and so do most adults. And this is a perfect puzzle game for Family, Girl Scouts, Boy Scouts, or Cub Scouts, and it will keep the parents entertained too. I put this together for a Wood Badge Course (9-780-23-1 if you know, you know) as a demo with scrap and leftover materials so had to do a bit of lumber milling. The nails are 12” landscape spikes but you can use standard 16d nails. You will have to scale the chest down by half if you choose to use 16d nails. By the way, if kids will be using this, grind or file the points off. It’s a safety thing.
Tools and Materials
Tools are simple if you are using stock ¾” material. You will need a square, tape measure, saw, and a drill. The materials I used were scrap. I started with 2x4s and milled them to 1” thick by 3” wide. The bottom is ¾ plywood and the top is ¾” pine. My game chest is held together with Titebond III glue and 2” deck screws.

You will need hinges and a latch. There are links at the bottom for these. Handles are also an option.

Layout
Layout is easy, it’s just measure and cut. Follow the cut list below if you are making it to print (for 12” spikes). If you need a drawing for a smaller box, leave a comment and I’ll work something out.


Cutting
Use the cut list below. Measure and cut the front and back at 14-1/2” long then 2 sides at 5-7/8” long.
I used my table saw and a Miter Gage which made short work of the cuts. Next, I cut the bottom to size. I just got a Microjig Grr-Ripper and folks I have got to say it is a big safety improvement. Check it out in the links below. Or here. I cut the top a 1/16” wider, so 14-9/16”. That gives a 1/32” overhang on the sides which makes an easy grip when you are opening the lid. You don’t have to do that; you can cut it to the length of your chest.
SAFETY TIP: BE SURE you use hearing protection when running power tools.
| Qty | Name | Description |
| 2 | Front & Back | 14-1/2” x 3” x 1” |
| 2 | Ends | 5-7/8” x 3” 1” |
| 1 | Bottom | 12-1/2” x 5-7/8” x ¾” plywood |
| 1 | Top | 14-1/2” x 7-7/8” x ¾” |
| 1 | Block | 1-7/8” x 1” x 7/8” |

Sanding
Now is the time to give everything a quick sanding. I used 220 grit in my orbital sander and if you are using S4S (surfaced four sides) lumber from the yard or big box store 220 grit is all you need.
NOTE: After sanding choose which side of the bottom will be the actual bottom. Meaning the outside. Then mark a small “X” in the center. This is where you will drill later.
SAFETY TIP: BE SURE you use a Shop Vac, Dust Collector or a N95 Mask when sanding.

Assembly
Assembly is quick. First, lay down two 6” long 1” wide strips about 1/8” to 1/4″ Thick. These are spacers that will inset the bottom. I used 1/8” thick ones for mine. I inset the bottom so that the chest sets on the edges. This helps if there is any bow in the plywood. Remember, I’m using scrap. Next put the bottom on top of the spacers and then the front, back, and sides to check the fit. If it is all looking good then apply glue. Be generous, we are relying on butt joints for this chest. I used Titebond III waterproof glue because I KNOW this will be left outside. Clamp everything in position and screw or nail the bottom and sides together. This is a perfect spot to use 8d finish nails or 8d casing nails if your side material is 1”. If you chose 3/4” material use 6d finish or casing nails. I used 2” deck screws because I wanted this to be bulletproof. Mine will be in and out of a Conex Box 2-3 times a year and will most likely be knocked, kicked, and dropped. Last thing to do is to install the block. Apply glue to the block and rub it in place centered in the inside. It doesn’t have to be perfect but should be pretty close. Now let everything fully dry. I usually let it sit overnight.

Drilling the hole
Last step in assembly is to drill the hole for the support nail. Be sure the glue is dry before you drill.
Size your hole to the nail you are using. I used a Mitutoyo Digital Caliper to measure the nail diameter then converted to nearest larger fraction and selected a drill.

Then I drilled at the “X”. Drill your hole 1” deep – don’t break through the block you glued in earlier.

Hinge and Latch Installation
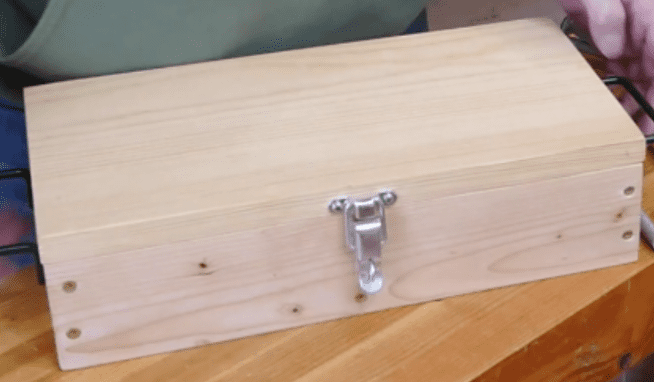
Well, the last steps to this project are to install the hardware. We need to add two small hinges 1-1/2” x 1-1.2”. I used Stainless Steel Hinges but you can use whatever fits you application. To position the hinges I first put 3 business cards in each end of the top to box joint with the small dimension up. This provided me with a bit of space between the lid and box and created and easy way to position the hinges a set distance in from the sides without having to measure. I evened everything up and clamped the box in position then screwed down the hinges.

Next, is the draw latch. There are a lot of ways to secure the chest closed but I had a draw latch leftover from another project. I like the way they work for this application, but you could also us a butterfly latch too. Installing the draw latch is easy, just follow the instructions. Install the top part first then the lower part. Engage the latch then mark the holes with a pencil. THEN… move the hole center down about 1/16”. This will insure tension on the latch so it will stay closed. If you mess it up then just fill the hole with a sliver of wood and glue and reinstall.

Finishing
Finishing is up to you. A polyurethane works really well as does Boiled Linseed Oil. I used a simple wax and oil finish that I make myself.

Handle Installation
Finally handles. I had a pair of fixed handles laying around so used those, but you may want to try Stainless Steel handles instead.

Congratulations
Wahoo – you are done!! Check the latch and hinges and load your nails in the box. If you want to see how to solve the puzzle check out the end of my video.

Thanks for reading and until next time Good Making!
Bill
Visit my Etsy Store at www.etsy.com/shop/30MinuteWoodshop
Facebook https://www.facebook.com/30MinuteWoodshop
Links to my Videos and Blogs
Whiskey Display Video https://youtu.be/vVuqMnA4IPo
Barrel Stave Bottle Opener Blog https://30minutewoodshop.com/barrel-stave-bottle-opener/
Mid-Century Modern Two Tier Plant Stand Video https://youtu.be/kmgkzB6utZA
Tools you may need
Microjig Grr-Ripper https://amzn.to/40GjvBq
WoodRiver Snap-Set Miter Gauge https://amzn.to/3DPGXCl
PORTER-CABLE Random Orbit Sander https://amzn.to/3YdqIXL
PORTER-CABLE Wet/Dry Vacuum Stainless Steel https://amzn.to/3YiLLby
JET Dust Collector, 2-Micron Canister https://amzn.to/3HHguIh
3M N95 PPE Mask https://amzn.to/3x4NGEu
ISOtunes Bluetooth Earmuffs https://amzn.to/3lpj1iA
Mitutoyo Electronic Digital Caliper https://amzn.to/3DS2tX5
Stainless Steel Butt Hinges, 1.5 inch x 1.5 inches https://amzn.to/3HENUaq
Buckle Latch, 304 Stainless Steel https://amzn.to/3RHfPey
Stainless Steel Butterfly Draw Latch https://amzn.to/40Eo2UQ
Stainless Steel Pull Handle https://amzn.to/3Xi7Vtg