
Everyone needs a place to hang their hat…or coat. And this easy to build Farmhouse Coat Rack is perfect for it. Whether in your entry or mudroom you won’t lack space and you everyday coats and gloves will be close at hand. And this is a great companion piece for the Farmhouse Bench (Video and Blog links below)
This farmhouse coat rack features dual hooks though the drawing shows pegs which are more traditional. The backboard and shelf are washed in white eco-friendly latex paint. This is a really easy project and something you can start in the morning and hang in the evening. And when you are done, you will have a piece you can use daily and that showcases your work and craftsmanship
I’ve provided links below for tools and materials for you to explore.

Tools
Nothing too special in the way of tools. You will need a tape measure, table saw, drill motor, and you will need a dado blade to cut the groove for the shelf. I have a link to a Freud 8” Professional Dado Stack is below which is what I use and is a superb piece of equipment.
Materials for the Farmhouse Coat Rack
Again, simple. You will need two 6’ pieces of 1”x 8” pine or other suitable wood, glue, 1-5/8” #6 deck screws, and 4 double coat hooks.
Layout
Measure and cut two pieces 24” long.


Cutting The Groove
Next part is easy. Install a ¾” dado stack. Then set it to a depth of 3/8”. Set your fence to 2” and run one piece through. One pass through the dado stack is all it takes to create the groove for the shelf. I used brass set up gauge blocks to ensure and accurate depth of my cut.

If you don’t have a dado blade don’t worry. You can use a 3/4″ router set to a depth of 3/8″ or you can just glue and screw your shelf to the back. (see option below)
Sanding
Sand all surfaces smooth. I use and orbital sander and 220 grit sandpaper. While you are sanding, look for loose knots. If you find any put on a few drops of thin CA glue, then resand after it dries. That will keep them in place for a very long time. And don’t forget the ends and be sure to break the sharp edges. Personally I did not use sand paper to break the edges. I used a compact router and an 1/8” roundover bit.
IF you are using a roundover bit to ease the edges be sure to mark the back edge of the shelf. Whether using a dado or butting it to the back you want that back edge to be crisp and sharp. SO do not round over the back edge of the shelf.
Assembly of the Shelf
Check out the plan below. The plan calls out wood pegs as more traditional look but I suggest dual coat hooks which makes the project easier. Also, instead of making a 6” shelf I made it 7-1/2” because its the stock 1×8 dimension and saved me from buying another piece of 1×6.
Now all you have to do is to run some glue in the groove and slip in the shelf. Turn it over and drive in two 1-5/8” #6 screws. I suggest deck screws.
Optional shelf attachment
If you do not have a dado, then edge glue and clamp the shelf in position 2” down from the top. Install four 2” deck screws from the back into the shelf edge. You can remove the clamps. The screws will hold the shelf in place until the glue dries.
Finishing
With the back and shelf assembled you need to paint. Find a pint of low VOC Eco-Friendly Latex. You can get a small sample at one of the big box stores for about $6-$7. Mix it about 30/70 water to paint. It should be pretty thin. After I applied the wash, I was still able to see the grain through the paint. It won’t take long to dry.

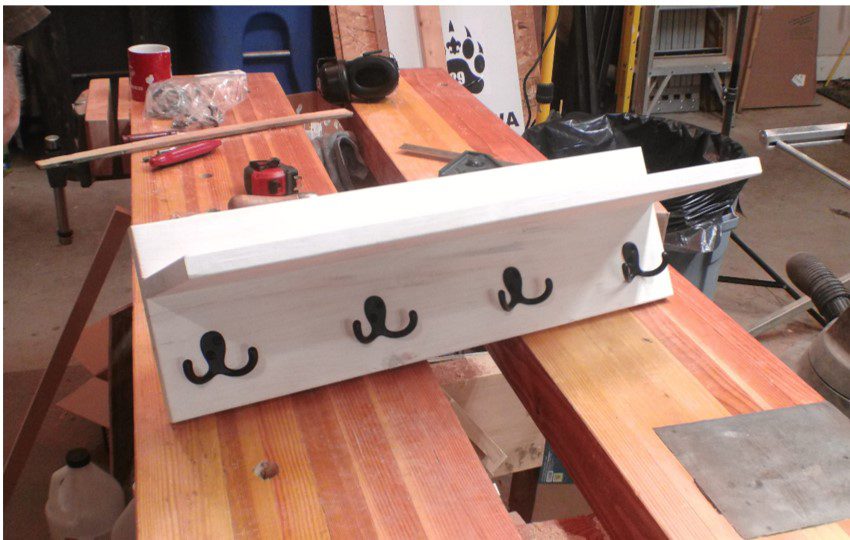
Final Assembly of the Farmhouse Coat Rack
Time to put the hooks on. All the hooks are 1” up from the bottom. The end hooks are 2” in from the edges. And the two center hooks are 6-5/8” apart – evenly spaced. I used heavy-duty two-faced tape on the back of each hook to get them positioned and hold them in place.

Next, I used a Vix Bit, which is a self-centering drill bit, to drill pilot holes for each of the hooks. Vix bit is made in the USA by S. E. Vick and you owe it to yourself to ha. Using the double-faced tape really simplified the job.
I drove the screws to secure the hooks in place. BE SURE YOU CHECK SCREW LENGTH. Use 3/4” or 5/8” #6 screws. You don’t want them poking out the back. IF they do, you will have to remove and file them off. Or hit them with a die grinder.

With that my friends, the project is done. Oh, don’t forget to sign the back! You have a piece you can use daily and that showcases your work and craftsmanship

Well, thanks for reading and until next time Good Making!
Bill
Video for this Project, Farmhouse Coat Rack https://youtu.be/spj8z6rixXI
And it’s companion video on how to build a Farmhouse Bench https://youtu.be/7S9SpDErJ5Y
With the accompanying Blog https://30minutewoodshop.com/?p=267
Tools you may need
Freud 8” Professional Dado Stack https://amzn.to/3tx7HCz
VixBit (you owe it to yourself to have the original USA made) https://amzn.to/3xlchVs
Whiteside 9810 Brass Set Up Gauges, 5 Piece Set https://amzn.to/39rfZ86
Spectape Double Sided Adhesive Tape https://amzn.to/3xqMafR
Double Coat Hooks https://amzn.to/3QiptTG


