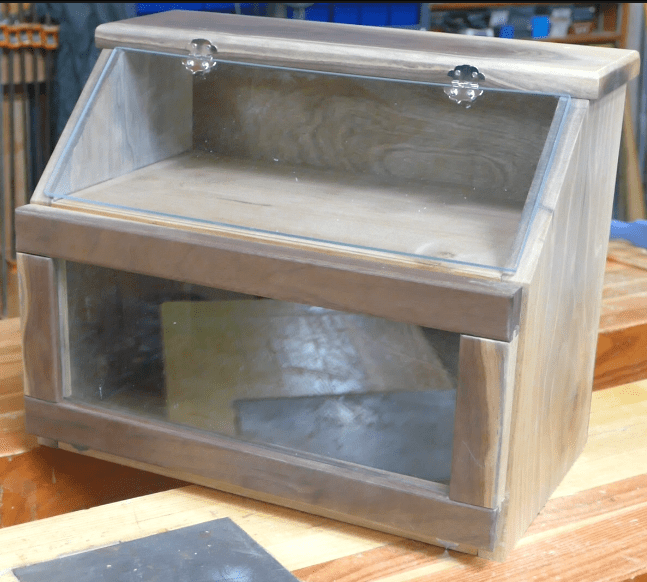
My son is really getting into bread making and for Christmas he wanted a bread box. So while my wife and I were out at an antique store up in Traverse City I saw a shelf bread box. Now, in no way is it an antique. I dare say it’s not even vintage. It’s just something someone made and I thought it was kind of cool. It’s a bit different than the one I’ve made here but it gave me the inspiration for creating this bread box.
I particularly like the design of this box because it gives you a compartment for a sizeable loaf of bread or possibly 2 and an area for keeping your bagels, croissants, and pastries. Also because it has clear doors you can actually see what’s in the bread box.
I will say this is not a 30 minute project but it is a lot of fun to build. It requires using multiple skills, time, and patience. It’s about a 6 to 8 hour job plus dry time for the finish. But in the end you’ll have a heirloom piece that you can pass on to anyone in your family that likes fresh bread.
Tools and Materials
So, for materials you’re going to need about 4 board feet of lumber for the bottom, sides, top, doors, and shelf. I’d suggest a hardwood Like Cherry, Maple or Walnut. You could use pine also. You also need two sets of small decorative hinges 4 half inch long #6 screws with nuts and a magnetic catch. And last but not least you’ll need a piece of plexiglass that’s about 15 inches long and 10 inches wide.

Layout

There are a lot of layout steps involved in this bread box project. But let’s start with sizing your materials and this is where the sketch below will help you out. Start by sizing all your parts. Which is cross cutting and cutting to width. Once you have those you’re 80% of the way done.
Cutting
Start by crosscuting to length the top, sides, the shelf, and bottom.

Then you’re going to need to size them to the correct width.

With your box pieces cut next you’ll need to cut the 45° angles off the sides.

Routing and sanding
I suggest that you route the front and side edges of the top with a ½” Roundover bit or a Roman Ogee.
With everything cut, sand all the surfaces and edges. If you have any burning you can use a scraper to scrape the burn marks off very easily. It usually a LOT faster than trying to sand them out.

Box Assembly and Glue up
Assembling the bread box is pretty straightforward. There are several ways you can fasten it. I chose to use pocket screws for the bottom and biscuits for the shelf.
The setup for the pocket screws is very easy, especially if you use a Kreg jig. Clamp your jig to the bench then measure in about one inch from each of the corners. Use these measurement marks to set the left and right hole on each side. Clamp the bottom in the jig and drill the holes.

To put the shelf in I decided to use biscuits. Specifically, 2 #20 biscuits on each side. I have a Porter Cable biscuit joiner which comes in really handy for this type of work. Setup with this particular tool is really easy because it’s designed to work with three quarter inch material.
The first thing to do is to mark the center line for the biscuits. The easy way to do this is to use an old carpenter’s trick which is to take your tape measure, hook it on one side and swing it till the number 12 touches the far side then strike a line at four inches and eight inches. You can use your combination square to extend that line all the way from end to end.

Next clamp your piece onto your bench and with the biscuit joiner, line up on the line and cut your biscuit slot. Do this three more times and the shelf is done.

Now we have to put biscuit slots in the sides. Use the shelf to mark the center lines for the biscuits. Next clamp a stop crossed the side which is where the biscuit joiner will rest. With the center lines marked and the stop clamp down line up the biscuit joiner and make the slots.

With all your biscuit slots cut and your pocket holes in it’s time for assembly. Apply glue to the surfaces and clamp everything in place. Clamping in place is very important for the pocket screws because occasionally the pieces we’ll move a little bit. With everything in place drive the pocket screws leave the clamps in place for a few hours until the glue dries.

Applying the finish
This is a good time to start applying finish to the box. I suggest you use a wipe on varnish for all the exterior surfaces and edges. And put on two to three coats. For the interior you can leave it raw wood or you can apply a thin coat of a mineral oil just to help seal it a little bit.
Making the rails and styles
The lower door is rail and style, very similar to your kitchen cabinets. First thing you need to do is make sure your rails and styles are the appropriate width. And the correct length. I usually cut all of mine a little bit long to start with then trim up later. Next you need to sand all your parts at this point I would sand them down to 320 grit.
At this point you need to put a centered quarter inch groove into all the rail and style pieces. I suggest you do this with a table saw because it’s far easier than any other method.

With the grooves in, you need to very carefully measure and cut the styles, those are the vertical pieces, to length be sure to include the extra quarter inch for the tongue that goes into the rail slot. You’ll cut a tenon on each end of each style. The easy way is to use a table saw but be sure you’ve dialed it in so the tenon it’s a snug fit.
Next, cut the rails, the top and bottom pieces, to length. Again, be very careful in your measurements.
With your rails and styles cut to length the tenants cut and the grooves in it’s time to put our finish on. Tape any areas where glue will be. I suggest you use a wipe on varnish because it’s easier to control it won’t get all over the glue areas. Give these pieces several hours to dry.
Now is a good time for you to measure and cut the plexiglass to fit into the grooves in the door. When you cut it make it 1/16th of an inch smaller than the total distance needed.
Assembling the lower door
With the finish dry and the plexiglass cut it’s time to assemble the lower door. This is very easy, just apply glue on the tenons and the edges, slide the glass in and clamp everything in place gently. Too much force could warp the door. You just want to hold it together

Assembling the upper door
The upper door is really easy. Cut the appropriate size piece out of the plexiglass and then use two face tape to stick the hinge halves onto it. This will allow you to mark the centers. The center is marked drill all four holes. But the holes drilled install the screws with washers and nuts. Tightened firmly but do not overtighten.
Installing the lower door
With the doors put together it’s time to install. Start with the bottom door and attached the hinges to the bottom of the door about 1/2 inch in from each side. Be sure that you pre drill holes for the screws about 1/16th of an inch diameter and about an 1/8 inch deep. The screws are small and will snap off very easily. Screw the hinges into place. Next lay the bread box on its back and center the lower door and screw it in place.

Installing the upper door
The upper door follows the same process but you only have to do the upper portions of the hinge. Again though pre-drill and be sure that you do not overtighten the screws.

Door catch installation
We’re closing on the end of the project at this point. You need to install the door latch. This is a simple magnetic catch on one side with the steel strike plate on the other. Center the magnetic catch at the bottom of the upper shelf and screw it firmly in place making sure that the magnet is flush with the edge of the shelf.

Next you need to install the strike plate on the door. Center the catch plate on the door and screw it into place.

Back installation
The last thing to do on this project is to install the back. You need to cut the back to fit your project. And make it an ¼ of an inch smaller in all dimensions. You also need to finish it before you install it. I suggest that you use a varnish on this particular part of the project and be sure it’s thoroughly cured.
Center the back on your project and be sure it’s pushed all the way up to the top. Nail it down with four or five 5/8 inch 18 gauge brads on each side. And two or three in the bottom.

The project is done
Well this was a pretty complex project that took quite some time to do sorry it’s not a 30 minute project but it was a heck of a lot of fun to do. And I’m sure my son will really like it. This is a project I really think you ought to try because it we’ll use a lot of your skills and when you’re done you’ll really have something that will last last a lifetime.

If you do make this project, congratulations on a job well done. And do me a favor and post it on my Facebook page (see link below).
Hope you got something out of this and if you did, do me a favor, hit like and subscribe. I’d appreciate that a lot.
Thanks for reading and until next time Good Making!
Bill
Visit my Etsy Store at www.etsy.com/shop/30MinuteWoodshop
Facebook https://www.facebook.com/30MinuteWoodshop
Links to my Videos and Blogs
Create Your Own Dice Vault https://30minutewoodshop.com/?p=1226
DIY Whiskey and Cigar Butler https://30minutewoodshop.com/?p=550
Farmhouse Key Rack https://youtu.be/I65FGq4dKYY
Create Your Own Lazy Susan https://30minutewoodshop.com/?p=491
Tools and Materials you may need
Ridgid Oscillating Belt Sander https://amzn.to/45C3rTK
Starrett Combination Square https://amzn.to/3XpbrDN
WoodRiver Low Angle Block Plane https://amzn.to/3pkNvos
Milwaukee M18 Jig Saw Kit https://amzn.to/3FAWXsS
BOSCH Compound Miter Saw https://amzn.to/421A1vl
Minwax Fast Drying Polyurethane https://amzn.to/3V5h0pO
PPE Gear


