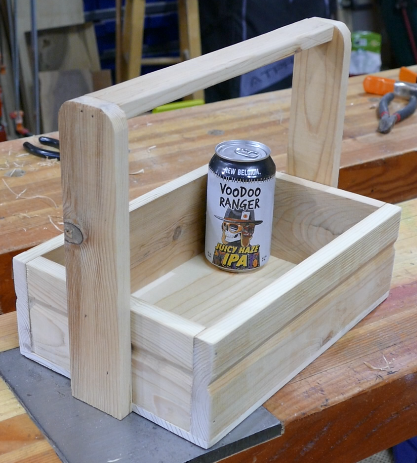

Football season is here and so is tailgating. If you’re like me I don’t actually put on the tailgating event but I usually attend. My cousin has tickets to the Michigan State games and we tag up whenever we can. I’m usually the guy that brings some beer, eats the burgers and wings, and then leaves. So, getting the beer to the tailgate is sometimes problematic. Mostly because I usually have a series of individual beers that end up in a paper bag. So I thought I’d make something kind of classy that I can put in eight or 10 beer along with some ice and carry it from my car which is usually a long way out, to the tailgate and then share it around.
This is a super easy and cheap to build beer caddy project. You don’t need any more tools than a handsaw, tape measure, hammer, and nails. So let’s start building

Tools and Materials
The materials for this project, if you use the sketch, is standard 1 by 6 material in pine. I happen to use Western Red Cedar. I use this material because it was in my off cut box from previous Eagle Scout projects. However the main wood was recovered from an old lumberyard that was being torn down and it is old Dutch lap siding and you can tell it’s old because the ring lines are super close together. For me this will be perfect because I am going to be actually using it they carry both beer and ice.
As far as tools, as I said, you only need a handsaw, a tape measure, hammer, and nails. I, however, use my radial arm saw, my table saw, and my air nailer as well as a few clamps and I also use waterproof glue.

Layout
There really is no layout in this project per se. If you’re using stock material you’ll have to cut it to the appropriate width as noted in the sketch below as well as the noted lengths. Now, make sure you adjust this design to meet whatever needs that you have for instance, I did not put in the internal separators. I did not want those because I am going to be using ice between all the bottles this will more than keep the bottles in place while I carry it. Also too, you may decide to use thinner material. So adjust the dimensions to meet your needs.

Cutting
The first step was to rip the sides and ends to the appropriate width. In this case it was 3 1/2 inches. At this time I also cut two strips at 2 inches wide and one strip at 1 1/4 inches wide. These will be my handles and handle uprights. With all my pieces ripped I cross cut the front and the back 12 inches and the sides to six and three quarter inches. This gave me all sides of the box. Last, I use a 1/4 inch piece of Pine for the bottom and cut that out to fit. Additionally, I cut the handle supports off at 10 inches and the handle at 12 inches.

Box Assembly and Sanding
All this is, is a box, so assembly was super easy. I used waterproof glue on all the edges clamped it in place and then used 1 1/4 inch 18 gauge nails to hold everything together. Next I made sure everything was square applied glue to the bottom and nailed it in place with 5/8 inch 18 gauge nails. I used 3 nails per side which in conjunction with the glue it is plenty.
Next I went ahead and sanded the outside with 220 grit sandpaper in my orbital Sander. This got rid of a lot of the dust and dirt that accumulated from having sat in the lumberyard for 60 or 70 years as well a softening the corners.

Handle Assembly
With the box done the next step was to assemble the handle. Next I applied glue to the handle uprights and nailed them in place with 1- 1/4 inch 18 gauge nails. The handle i’s nothing more than a rectangular bar at the top. I heavily rounded all the edges so it would be easy to hold. I glued and nailed the handle at both ends.

Finishing
Because of the way I am using this I am not putting any finish on this project. My intent is to use this for beer and ice and carry it to and from the car. So any finish I apply would have to be water resistant and frankly I don’t want to bother with that. This is a fast and easy project that can be duplicated at any time in a matter of about 35 minutes so I expect it to last four or five years and then I’ll make another one. You of course can apply any finish you like and if you do I would recommend a marine spar varnish.
One last thing I did which isn’t shown is I applied a clear silicon caulk to all the inside corners. Mostly because I don’t want water leaking all over me while it melts and I’m carrying damn thing. If you don’t plan on putting ice in yours then you don’t have to worry about this stuff.
And the project is finished
With that the project is done. This is a really fast and easy project and it’ll serve you well for several years of tailgating allowing you to carry your beer to and from tailgate and not have to worry about it. I hope you take the time to make this project or something very similar because I think you’ll find it easy and fun as well as useful for this tailgate season

If you do make this project, congratulations on a job well done. .
Hope you got something out of this and if you did, do me a favor, hit like and subscribe. I’d appreciate that a lot.
Thanks for reading and until next time Good Making!
Bill
Visit my Etsy Store at https://www.etsy.com/shop/30MinuteWoodshop
And Follow on Social
Facebook https://www.facebook.com/30MinuteWoodshop
Instagram https://www.instagram.com/bill_berklich/
Pinterest https://www.pinterest.com/30minutewoodshop/
Links to my Videos and Blogs
6 Tools to Start Woodworking https://30minutewoodshop.com/?p=3391
Create Your Own Dice Vault https://30minutewoodshop.com/?p=1226
DIY Whiskey and Cigar Butler https://30minutewoodshop.com/?p=550
Farmhouse Key Rack https://youtu.be/I65FGq4dKYY
Create Your Own Lazy Susan https://30minutewoodshop.com/?p=491
Tools and Materials you may need
Milwaukee M18 Fuel 2-Tool Combo KIT https://amzn.to/4l7vAsc
Milwaukee M12 Detail Sander https://amzn.to/46I6tss
Bostitch Nailer and Compressor Combo Kit https://amzn.to/3HsfXO6
Ridgid Oscillating Belt Sander https://amzn.to/45C3rTK
Starrett Combination Square https://amzn.to/3XpbrDN
Minwax Fast Drying Polyurethane https://amzn.to/3V5h0pO
PPE Gear
3M N95 PPE Mask https://amzn.to/3x4NGEu
ISOtunes Bluetooth Earmuffs https://amzn.to/3lpj1iA