
I was out fly fishing the other day and the wind picked up, not good for fly fishing so I packed up and drove home. When I got out of my truck and grabbed my rod the wind caught my door and the rod got crushed as it slammed closed. It made my two piece rod into a three piece rod and a piece of junk.
That got me thinking that I need to find a way to protect my rods. Now these are not expensive rods, these are ones that I pick up at “antique stores” usually for about $15 to $25. So they’re not real expensive but they are good to use and this particular one was a graphite South Bend from the 90s. And frankly it will be sorely missed because it was a perfect size and fun to use for pan fishing.

With all that said having been in many of these “antique stores” and seen many an antique or at least vintage fly rod box I figured I could make one. And so can you. This is super easy and while it’s not quite a 30 minute project it won’t take you more than an hour.
Tools and Materials
Traditionally, these fly rod boxes are made with Western Red Cedar so we’re going to use two Western Red Cedar fence pickets. They’re generally the perfect width and length to get all the sides, bottom, top and ends out and they’re about 5/8 thick. That’s a little bit thicker than what the antique ones are but it works out perfectly for us because it cuts our workload dramatically. So when you’re buying your fence pickets make sure that they are western red cedar and not treated.

Sanding Off the Fur
Your very first operation in this project is to sand off all the fur because these fence pickets are always rough cut. Grab some 60 grit and your Orbital Sander or better yet a belt Sander and rip off everything down to a nice smooth surface. Once you have that done run through the grits 80, 120, 220, and even 320 if you want to give you a really smooth surface. Standing right now makes the whole job 100% easier.
Layout
With all that out of the way take a look at the dimension sketch down below and set up your table saw to make a few rip cuts and crosscuts. I will say though before you get started be sure you size this box to fit your fly rod. Mine is sized to fit a 8′-6″ hollow fiberglass rod from the late 60s that was made by South Bend. I actually love the rod even though it’s a little bit whippy because it’s perfect for panfish and small trout.

Cutting
We’ll start by ripping the sides. Set the table saw to first skim off one edge of the fence picket. Basically what you’re doing is you’re jointing the edge. This gives you a smooth straight edge so the rest of the cuts will be consistent and even. Next set your fence for 2- 3/8 inches add rip off the front and the back. Last, reset the fence to 2 inches and rip the bottom.
Set aside the last piece for the top and we’ll rip that to fit once the box is assembled.
Next you’ll want to do the layout and cross cut all of your pieces to the appropriate length. Mine was set for 54 inches. Make sure you adjust this length to meet and match your rods size. I cut all three, bottom, front and back at the same time to make sure they were the same length.
Crosscut to the appropriate length and you’ll have some leftovers. From the 2 inch bottom piece you should be able to get 1-3/4” x 2” ends.

Glue up
With everything cut up the next operation is assembly. I used waterproof glue and 2 inch long 18 gauge nails. You don’t really need to use nails. You could just glue and clamp the whole thing together and it will be good to go. I just didn’t like having to wait around for the glue to dry. Hence the nails.
During the assembly process make sure that all the ends are even. If they are not you’re going to have to come back and sand the ends smooth. This is not a big deal because Western Red Cedar is very soft so it’s a fairly quick process if you make a slight error.

Cutting the Top
The final cut for this project is the top so take the top place it on the box and clamp it in place then go ahead and mark it. Next thing you want to do is measure it across at three places both ends and in the middle. You should get the same dimension if nothing is warped. What you’re going to do is set the table saw fence to whatever your dimension is. If everything came together the way it should the dimension should be pretty close to 3-5/16”. But the reason we’re not using that dimension exclusively is because that 5/8 thickness can vary. There’s not a lot of quality control on the thickness for these things. So mark and cut and then cut it to length.
Sanding
There still is some sanding you need to do on this and that is primarily for the edges so take your Orbital Sander with 220 grit sandpaper and hit all the edges and corners just to soften them so it feels good whenever you touch them and especially the pointy corners because when you push this into your car you don’t want it punching a hole in the seat cushion or the overhead.
Finishing
Now is the time to finish. I use boiled linseed oil because I don’t expect this to be ever in the rain or sitting out anywhere so all I want to do is put a thin coat of protection on it. The boiled linseed oil also brightens up the color and deepens it quite a bit. In many cases it will bring out the red nature of some of the wood. I only put the boiled linseed oil on the outside because I did not want it touching my rod, the cork, or any of the metal parts because I didn’t know how those would react to boiled linseed oil. And frankly the antiques that you will see don’t have any finish on them anyway.

Installation
OK there are several things we need to install. First is going to be the hinges. My box is 54 inches long and really needed three hinges. Those are easily screwed and glued in place and yes I did glue them in place with a drop of CA glue. Just don’t get it in the hinge. Also because I use these small brass hinges they came with small brass screws. I pre-drilled for each screw. I did that because I’ve had these screws break off even in pine.
Next you need to install the latch there’s lots of different kinds of latches. I use a snap latch which is usually applied to a jewelry box. By the same process, position everything and add a small dab of CA glue and that will make the final installation very easy. Again be sure you pre-drill before you try to install the tiny brass screws.

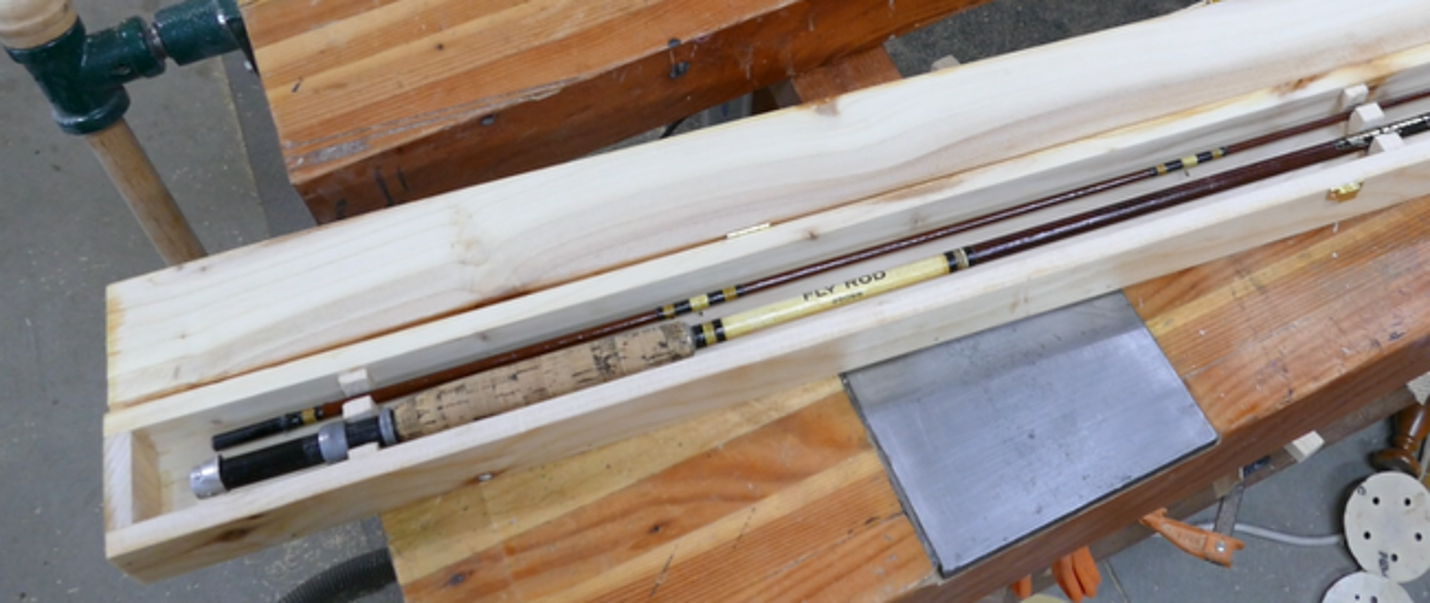
The last thing you need to install are the rod retainers inside. Go back to that piece of 2 inch leftover that you have cut off 3 pieces that are about 1-1/2 high And slipped them into the interior. The two end ones should be about 3 to 4 inches in from the ends and the third piece should be in the middle. Next lay your ride sections in and mark where they fall. Pull those pieces out and use a fine handsaw to cut down and chisel out the resting notches for the rod pieces. With that done put a dab of waterproof glue on each of the ends and edges and push them into place.
Congratulations
After all that your project is finished. Drop your rods in, latch it closed, and you are ready to hit the water.

Hope you got something out of this and if you did, do me a favor, hit like and subscribe. I’d appreciate that a lot.
Thanks for reading and until next time Good Making!
Bill
Visit my Etsy Store at www.etsy.com/shop/30MinuteWoodshop
Facebook https://www.facebook.com/30MinuteWoodshop
Links to my Videos and Blogs
Create Your Own Dice Vault https://30minutewoodshop.com/?p=1226
DIY Whiskey and Cigar Butler https://30minutewoodshop.com/?p=550
Farmhouse Key Rack https://youtu.be/I65FGq4dKYY
Create Your Own Lazy Susan https://30minutewoodshop.com/?p=491
Tools and Materials you may need
DEWALT Drill and Driver Combo https://amzn.to/42yybmy
DEWALT Router Plunge Base Kit https://amzn.to/3LKkJEK
Ridgid Oscillating Belt Sander https://amzn.to/45C3rTK
Starrett Combination Square https://amzn.to/3XpbrDN
WoodRiver Low Angle Block Plane https://amzn.to/3pkNvos
Milwaukee M18 Jig Saw Kit https://amzn.to/3FAWXsS
BOSCH Compound Miter Saw https://amzn.to/421A1vl
Minwax Fast Drying Polyurethane https://amzn.to/3V5h0pO
PPE Gear
3M N95 PPE Mask https://amzn.to/3x4NGEu
ISOtunes Bluetooth Earmuffs https://amzn.to/3lpj1iA