Let me show you how to upgrade your workshop efficiency with a DIY pegboard tape measure shelf.
This Pegboard Tape Measure Shelf is a great way to organize your tools and keep them neatly on display. It’s also a great way to keep your tools organized and easy to access. Plus, it’s a great way to improve your workshop efficiency!
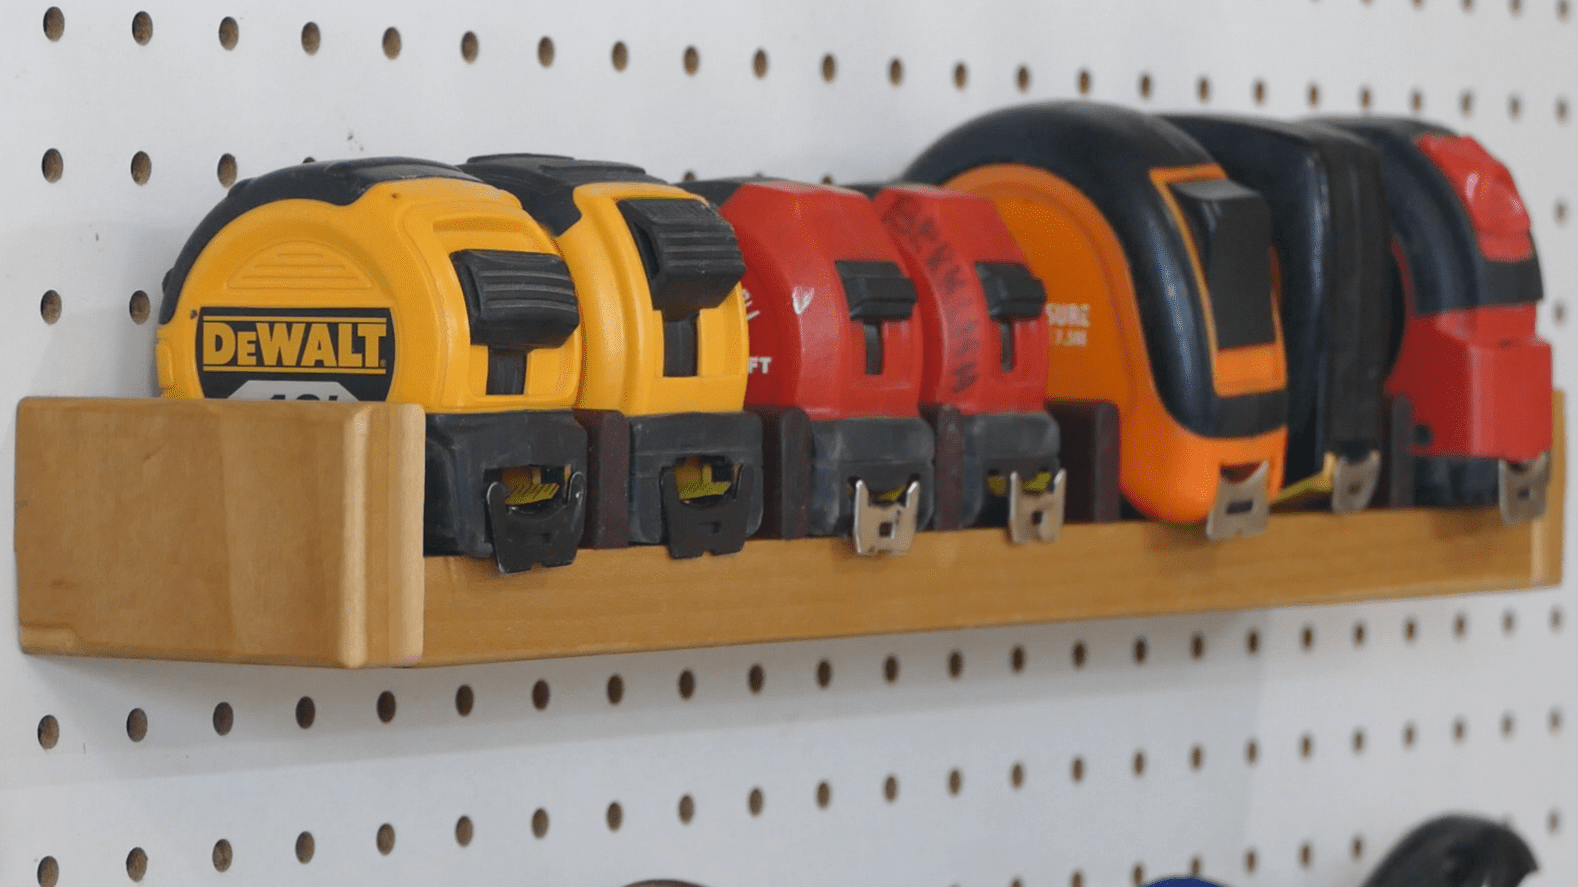
Peg boards are usually made for hanging. But there are those tools that you actually are better suited to a shelf. So here is an easy shelf that you can hang on your pegboard and rack you tape measures. It’s made of small scrap and assembled with only glue.
It will keep your tools organized so you don’t have to rummage through the bottom of your toolbox to find the tool you need. This hangs on your pegboard but can be changed so that it screws directly to your wall. It only takes a few tools and some really inexpensive lumber.
And follow this link to my Video to see how it is done.
Tools and Materials
The tools that you’re going to need for this Pegboard Shelf are minimal. You could do this one all with hand tools, that is a handsaw. but I suggest a few power tools. You will of course need a tape measure, a combination square, a bit set, a drill motor, and a compound miter saw.
And for materials you will need a 24” long piece of 1 x 4. A 22” piece of 1”x 3/8”, 1/2” will do too. Or you can use 1/ 4” but you will need to cut grooves for the dividers.

Layout
The design that I have included is specifically for the tape measures that I have. You will need to adjust the length according to whatever tape measures you plan on placing on the shelf.

I started my layout by simply placing the tape measures on the board with about 1/2” of distance between each and then measuring the total distance. This set my length of 16-3/4” inches.
I added ends to this shelf to keep the tapes from falling off. So, I cut two of those at 1-34” long.
For the dividers, I had a scrap piece of purpleheart that was 20” x 1” x 3/8” wide. This was perfect for providing the dividers between each of the tape measures just to keep them from banging together, falling over, and to give them a specific location to sit.

Edge Routing
If you are going to edge route, now is the time to do that. It is much easier and safer to route a long piece the try it with 6 3” long pieces. I set my router table up with a 1/4” radius roundover bit and ran both top edges leaving the bottom edge unrouted.

Cutting
Once you have your shelf laid out and the divider piece edge routed, it’s time to cut everything. I cut the shelf and end pieces on my radial arm saw. Next, I cut six pieces of the Purpleheart the same width as the shelf using my bench hook and Dovetail saw. Doing small pieces on the RAS is not really safe as they can [potentially go flying off if the blade catches them. And it usually ruins them too.

Glue-up
Glue up for this project is really easy. I did not use any nails or screws but relied simply on glue to hold everything together. Just apply glue to the ends, stand them up and clamp the whole thing together. Next you will need to install the dividers. You can follow the dimension sketch or do like I did and put each tape measure in and put a divider next to it. As I was doing that, I left about 3/16” on each side of the tape measure for clearance. The dividers are held in place with a rub joint. All that is as you apply some glue to the divider and then rub it in place. The surface tension of the glue holds the piece in place. Give this at least two to three hours to dry before you apply any finish.

Drilling Pilot Holes
The next step in this process it’s to mark the location of the hooks. I did that by holding the shelf directly up to the pegboard and marking the locations. Then measure down 3/8” along the centerline of the pegboard hole. Next drill 1” deep 3/32” diameter holes. This will ensure your L Hook goes in straight.
NOTE: Be sure your spacing is correct for your Pegboard. Just hold the shelf up to your pegboard and mark the hole centers.

Sanding
Sanding on this project is minimal as it will not be handled. You really can just sand the places you might touch. I focused my efforts on the front and top edges of the dividers where my hands would be and rounded all the sharp edges with 220 grit sandpaper.
Finishing
So, I used a wipe on boiled linseed oil for this project. I like it because it’s fast and easy. But you can use varnish, oil and wax, or spray lacquer. This project generally will not see hard use, so the finish doesn’t have to be a thick durable coating.

Assembly
Now, screw in the L hook to about the thickness of the pegboard. You will notice that I am using the small tool in the picture below. The material is a piece of Purple Heart that was left over. I drilled the hole in to the end and rounded the edges. If you are installing more than one of the L hooks, it’s far better to create a small tool like this because pliers never seem to work very well, and they always slip off. All you do is drill the hole then slip it over the L and spin the hook into place.

Done and Hung
Well, the project is done, hung and my tape measures are on the shelf and slotted. I have to say this was an easy project that knocked together quickly and cost me nothing to build. And, it adds a lot more to the organization of my shop. My tape measures are easy to see and easy to access. I am really happy with how this turned out. I’m thinking I probably need to do one for my pliers next.

Do me a favor, hit like and subscribe if you got something out of this. I’d appreciate that a lot.
Thanks for reading and until next time Good Making!
Bill
Visit my Etsy Store at www.etsy.com/shop/30MinuteWoodshop
Facebook https://www.facebook.com/30MinuteWoodshop
Links to my Videos and Blogs
Create Your Own Dice Vault https://30minutewoodshop.com/?p=1226
DIY Whiskey and Cigar Butler https://30minutewoodshop.com/?p=550
Farmhouse Key Rack https://youtu.be/I65FGq4dKYY
Create Your Own Lazy Susan https://30minutewoodshop.com/?p=491
Tools and Materials you may need.
DEWALT Drill and Driver Combo https://amzn.to/42yybmy
DEWALT Router Plunge Base Kit https://amzn.to/3LKkJEK
Ridgid Oscillating Belt Sander https://amzn.to/45C3rTK
Starrett Combination Square https://amzn.to/3XpbrDN
WoodRiver Low Angle Block Plane https://amzn.to/3pkNvos
DeWalt Drill Bit set https://amzn.to/3tnzxUs
Milwaukee M18 Jig Saw Kit https://amzn.to/3FAWXsS
BOSCH Compound Miter Saw https://amzn.to/421A1vl
Minwax Fast Drying Polyurethane https://amzn.to/3V5h0pO


