
Here is an easy project to start the summer. This small planter is quick and easy to build. And when you’re finished it will look great on your patio or your deck.
Tools and Materials
Materials for this project are very straightforward all you’ll need an 8 foot Western Red Cedar 2×4, and a couple of Cedar fence pickets. For tools this could all be done with a hammer and nails and a saw. I of course use power tools because that’s what works for me in my shop. Using power tools will cut the time it takes to build the project by a significant amount though. Either way in the end you’ll have a great project.


Layout
The demented sketch is below and you can see how easy it is. All you have to do is some cross cutting some gluing and nailing or screwing if you choose to use screws.

Cutting
First start by cross cutting your western red cedar 2×4 into eight 12 inch long pieces. These will be the legs. Next cut eight 12 inch long pieces from your fence pickets 12 inches long. These will be your sides. You will need to strip off two pieces of your fence pickets that are one inch wide for the bottom supports.

Sanding
Ha, no sanding on this project. See, I told you this was a super easy project. If you’re using fence pickets however, you could sand some of the roughness off. Personally, I would not do that because the pickets give it a rustic look.
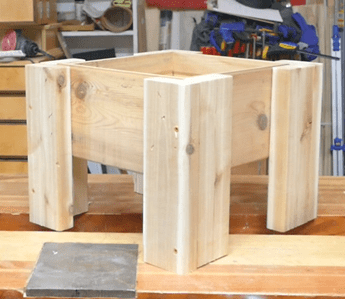
Leg Assembly
leg assembly is really straightforward all you need to do is to apply some glue along the long edge of one piece and nail the second piece to it forming an “L”. I screwed mine together but you can use nails. I did this because I didn’t want to have to leave the legs in the clamps for several hours before I got the project finished. By the way be sure you use waterproof glue like titebond 3.
Repeat this process for the other three legs And you are you ready to move on to assembling the sides.


Side Assembly
Start assembling sides by laying both legs down applying glue and laying on the sides. Nail these down with three or four nails. Do the same thing for the second side. And of course continue the operation for the third and fourth side.


Support Batten Assembly
Now we need to put in the support battens. Again super easy just apply some glue and nail them in at opposite sides. These will provide the support for the bottom slats.

Slat Assembly
The final step in this whole project is to drop in the slats. Cut several bottom slats that are about 3 inches wide and about 12 inches long. Make sure you measure so that they fit. Next, literally drop them in the bottom. The battens will provide support for these pieces.

Wahoo – you are done!!
Well this project is finished other than dropping in a plant. It was super easy and quick to build and I think it looks really good. This will help dress up your deck or patio and probably make your summer a little bit brighter. Ohh and don’t forget to water the plants. Have a great summer and see you soon.

If you do make this project, congratulations on a job well done. And do me a favor and post it on my Facebook page (see link below).
Hope you got something out of this and if you did, do me a favor, hit like and subscribe. I’d appreciate that a lot.
Thanks for reading and until next time Good Making!
Bill
Visit my Etsy Store at www.etsy.com/shop/30MinuteWoodshop
Facebook https://www.facebook.com/30MinuteWoodshop
Links to my Videos and Blogs
Create Your Own Dice Vault https://30minutewoodshop.com/?p=1226
DIY Whiskey and Cigar Butler https://30minutewoodshop.com/?p=550
Farmhouse Key Rack https://youtu.be/I65FGq4dKYY
Create Your Own Lazy Susan https://30minutewoodshop.com/?p=491
Tools and Materials you may need
DEWALT Drill and Driver Combo https://amzn.to/42yybmy
DEWALT Router Plunge Base Kit https://amzn.to/3LKkJEK
Ridgid Oscillating Belt Sander https://amzn.to/45C3rTK
Starrett Combination Square https://amzn.to/3XpbrDN
WoodRiver Low Angle Block Plane https://amzn.to/3pkNvos
Milwaukee M18 Jig Saw Kit https://amzn.to/3FAWXsS
BOSCH Compound Miter Saw https://amzn.to/421A1vl
Minwax Fast Drying Polyurethane https://amzn.to/3V5h0pO
PPE Gear
3M N95 PPE Mask https://amzn.to/3x4NGEu
ISOtunes Bluetooth Earmuffs https://amzn.to/3lpj1iA


