
Grilling season is here. All those lazy days of summer, picnics, and the beach and of course the sweltering heat. But it all leads us to firing up the grill, charring some steaks and burning some chicken. So I thought I’d create a set of turned BBQ tools or should I say grilling tools.
Tools and Materials
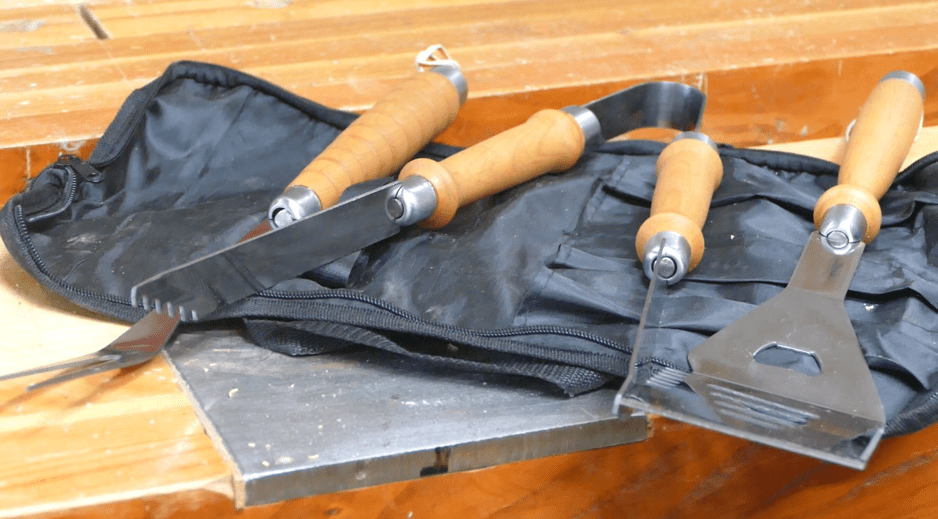
Unless you’re good with the forge, anvil, and hammer You’re going to need to buy the ironmongery needed for this project. Pen State Industries has a really nice set of grilling tools complete with the case that are simple to turn and assemble. Here’s a link so you can find them easily. A couple items you’ll need beyond the grill toolkit is 4 pieces of 1 by 1 by a five to seven inch long turning blanks or several dry branches. This is a great project for wood rescued from the fire pile.


Layout
Layout for this project all you really need to do is cut to length the pieces needed for the tongs the spatula and the fork then find the centers and drill a couple of holes. Be sure you use and read the directions for the kit.

Drilling
Once your layout is complete, meaning once you’ve marked your centers, grab your drill support your parts and drill your holes to the specs in the instructions.

Roughing
With your holes drilled chuck your parts into the lathe. You’ll find that one end on each of the tongs needs to be secured using a wine stopper drive center. The other two pieces we’ll use a standard drive center. And of course I use a 60° live center at the tail stock.
Spin your stock and use roughing gouge to turn the squares into circles.

Detailing
With the roughing complete your next step is to grab your calipers and a square tipped carbide lathe chisel to cut and size the ends for the ferrules. Again be sure to follow these directions that come with the parts. I’m not putting things in here because a lot of times they change and I can’t know that unless I were to buy the parts and try them again.
Once you have the feral shoulders correctly sized pick up a thumbnail gouge and provide whatever detailing work you choose to have. The only two pieces that need to be pretty close are the right and left handle for the tongs the spatula and fork handles could be completely different so I have some fun with it. That’s what I did.

Sanding
The next step in this operation is going to be sanding. Depending on how sharp your tools are and how good you are you’ll have to run through the grits my suggestion is start with 80 grit move to 150 grit, then 220 grit, and finally 320 grit sandpaper. Also depending on type of finish you may want to run this down to 400 grit or even 600 grit.

Finishing
While the parts are still in the lathe this is a great time to apply a finish. There are quite a few really good finishes that would work well everything from boil linseed oil to an oil wax finish or even a pen type finish. Apply the finish and spend the part until you get the desired result.
Assembly
Assembly here can be fairly complex only because the parts are made in China and not always made well. I had to spend time filling and fitting a couple of the ferrules because they were cut poorly.
Caution: be sure you test fit all parts before you start applying epoxy or CA glue.
So here’s a trick that you’ll probably need to use with this kit. Screw all the pieces together before you start putting ferrules or anything else on. This will make it much faster during assembly because it can be very difficult to get these screwed in quickly.
First thing you’re going to want to do is to test fit everything. Then mix up some 5-minute epoxy and apply it to the point you’re working on. Be sure you put the ferrules on before you start screwing the parts together. Apply epoxy both to the hole and to the ferrule end. Push or screw everything together then use acetone to clean up any wet epoxy. Try and keep the acetone off the finish. Repeat this process for all other joints and connections. Then give it a good solid hour to cure. I know it says 5 minute epoxy but I always like to be safe.

The end
OK I had a fun time doing this project I hope you purchase one of these kits and give it a shot you’ll enjoy doing this and have something use for many summers in the future and something you could brag about.

If you do make this project, congratulations on a job well done. And do me a favor and post it on my Facebook page (see link below).
Hope you got something out of this and if you did, do me a favor, hit like and subscribe. I’d appreciate that a lot.
Thanks for reading and until next time Good Making!
Bill
Visit my Etsy Store at www.etsy.com/shop/30MinuteWoodshop
Facebook https://www.facebook.com/30MinuteWoodshop
Links to my Videos and Blogs
Create Your Own Dice Vault https://30minutewoodshop.com/?p=1226
DIY Whiskey and Cigar Butler https://30minutewoodshop.com/?p=550
Farmhouse Key Rack https://youtu.be/I65FGq4dKYY
Create Your Own Lazy Susan https://30minutewoodshop.com/?p=491
Tools and Materials You May Need
Pen State Industries BBQ Grill Tool Kit https://amzn.to/4fxmymJ
DEWALT Drill and Driver Combo https://amzn.to/42yybmy
DEWALT Router Plunge Base Kit https://amzn.to/3LKkJEK
Ridgid Oscillating Belt Sander https://amzn.to/45C3rTK
Starrett Combination Square https://amzn.to/3XpbrDN
WoodRiver Low Angle Block Plane https://amzn.to/3pkNvos
Milwaukee M18 Jig Saw Kit https://amzn.to/3FAWXsS
BOSCH Compound Miter Saw https://amzn.to/421A1vl
Minwax Fast Drying Polyurethane https://amzn.to/3V5h0pO
PPE Gear
3M N95 PPE Mask https://amzn.to/3x4NGEu
ISOtunes Bluetooth Earmuffs https://amzn.to/3lpj1iA