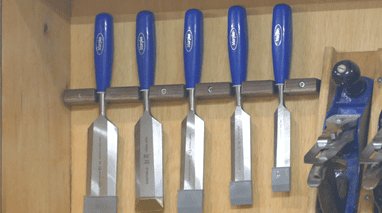

Here is an easy chisel storage rack that you could use in a tool cabinet, chest, or by adding a couple of L hooks you could hang it on your pegboard. My tool cabinet is an on again off again process but I am to the point where I want to start putting more tools into the case. This is of course always problematic because you always have more tools than you have room. For the moment, I’m focused on just hanging my Marples chisels so I can get it at the very easily. This is a really easy project and it’s really quick too. It is nothing more complex than drilling a few holes making a few cuts and applying some finish with maybe some sanding in between.
Tools and Materials
The material I use for this particular project with a piece of walnut that I got from my brother-in-law. He had felled a walnut tree in his yard and had it sliced up and it’s been sitting in his barn drying for the last 10 years. So this piece of material has a little bit of family history to it. You could choose to use any material of course from a 2 by 4 to a 1 by 4 in Pine, Maple, Oak, Cherry or any other wood. They all work equally well. The few tools you need are a saw a few drills and a screwdriver. I used a router to knock off all the sharp edges off but you could do the same with a file or sandpaper.


Cutting
To start this project you’ll need to cut your piece of wood to the dimensions needed for your application. You can follow the dimensions on the attached dimension sketch but understand those are for my tool cabinet. Your layout may be different. I would say however that the width is probably going to be the same. It would just be the length you’ll need to adjust. So make your cut the length and the width and you should be ready to layout all your holes.
Layout
Your next step is to layout all the holes. You could use the dimensions I have but that’s for five wide chisels. You can get 6 or maybe even 7 have smaller ones. First thing to do is mark the depth from the edge using your combination square. Next layout the whole centers from one edge. With those marked you are ready to go drill.

Drilling the Holes
Drilling the holes is probably the most complex task you’ll be involved in doing here. Because I was using a tapered reamer I started with 1/2 inch hole which I bored out to about 11/16” at the top. This fit my chisels perfectly because the Marples have a tapered ferrule. Depending on the type of chisels that you have you may have to actually drill two holes one for the shank and one for the handle. This is actually more common because of chisel design. I would recommend that you make a prototype piece with at least one if not two or three holes to make sure that it matches your chisels.
With the chisel holes in I drilled four more through holes across the front so I could attach the rack to the back of my tool cabinet. These holes were also countersunk so that the screw head was sub-flush.


Cutting the Slots
Once you have all the holes in place you need to cut slots so you can get the chisel Shanks into the rack. For my Chisels, because of the taper on the ferrules, I set my table saw to cut at a 5° angle for one cut and then -5° for the other cut. Most likely, with your chisels, you will be making two straight cuts.

Edge Routing And Sanding
I anticipate pulling these chisels out fairly frequently. Because of that I didn’t want any sharp edges wearing away at the handle material. To reduce or eliminate the potential for wear I used a 1/8 inch roundover bit in my router and routed everywhere but the back. Then I took 220 grit sandpaper and thoroughly sanded all the edges, corners, holes and everything else.


Finishing
For this project I used a rattle can lacquer because it is generally non-reactive with most plastic materials. An alternate finish could have been a low VOC varnish. This is not a project that I would have used boiled linseed oil or other soft type finishes.

Assembly
For me the assembly for this project was really easy all I did was hold it up to the back and the appropriate spot, level it up and I drove 4 screws. Your assembly may be a little more difficult or a little easier depending on how you choose to do your mounting. If you’re going to mount this directly to a pegboard all you need to do is screw in two L hooks and you should be good to go. And obviously if you’re using a French cleat or some other method that should be equally easy to do.
I have to say this is another really easy and fast project and I’ll tell you what, it is going to make my life a lot easier by keeping my tools close to hand. I’m really happy with how it turned out. I hope you give this project a try.

Hope you got something out of this and if you did, do me a favor, hit like and subscribe. I’d appreciate that a lot.
Thanks for reading and until next time Good Making!
Bill
Visit my Etsy Store at www.etsy.com/shop/30MinuteWoodshop
Facebook https://www.facebook.com/30MinuteWoodshop
Links to my Videos and Blogs
Create Your Own Dice Vault https://30minutewoodshop.com/?p=1226
DIY Whiskey and Cigar Butler https://30minutewoodshop.com/?p=550
Farmhouse Key Rack https://youtu.be/I65FGq4dKYY
Create Your Own Lazy Susan https://30minutewoodshop.com/?p=491
Tools and Materials You May Need
Starrett Combination Square https://amzn.to/3XpbrDN
WoodRiver Low Angle Block Plane https://amzn.to/3pkNvos
Milwaukee M18 Fuel 2-Tool Combo KIT https://amzn.to/4l7vAsc
Milwaukee M18 Jig Saw Kit https://amzn.to/3FAWXsS
Milwaukee M18 Circular Saw Kit https://amzn.to/45kvLdL
Milwaukee’s M18 Compact Router https://amzn.to/4oh0pxm
Milwaukee M12 Detail Sander https://amzn.to/46I6tss
Bostitch Nailer and Compressor Combo Kit https://amzn.to/3HsfXO6
Kreg K4 Pocket Hole Jig https://amzn.to/45bxFgQ
Ridgid Oscillating Belt Sander https://amzn.to/45C3rTK
BOSCH Compound Miter Saw https://amzn.to/421A1vl
Minwax Fast Drying Polyurethane https://amzn.to/3V5h0pO
PPE Gear
3M N95 PPE Mask https://amzn.to/3x4NGEu
ISOtunes Bluetooth Earmuffs https://amzn.to/3lpj1iA


