
This is crossover season for Cub scouts, so if your son or daughter is a WEBLEOS 2, and they’ve completed all the requirements for Arrow of Light, then they have earned one of these Arrow of Light plaques. They can get a really cool little patch too, which by the way, they can wear on their scout uniform if they cross into a Troop. This is really easy project and you can impress everyone in the Den and the Pack with your awesome woodworking skills.

I’m going to show you how to make a really nice Cub Scout Arrow of Light Plaque using a router. And in my case, a FoxAlien CNC to personalize it.
Tools and Materials
You will need a 24 inch piece of 1 by 8 pine. A “1×8” is generally 3/4 inches thick by 7-3/8 inches wide. The design is based on a 1×8 to provide enough material to carve the sunburst, an arrow, and still have room for the recipient’s name. It’s 24 inches because that will easily fit a 20-22 inch arrow to be hung at the bottom. As far as tools you will need a 1/2″ Core Box Bit and a plunge router, as wells as a router bushing to fit. I also used a FoxAlien CNC to carve in the name of each youth receiving the award. Note: you could also use a sign making “V-Bit” but you will need to tighten up on the dimensions for the pattern.

The FoxAlien is my first try at a CNC and WOW…well worth the money. It is super, super easy to use. I don’t have any experience with CNC machines. But I was operational in just a couple of hours. If you are interested there is a link at the bottom. There’s other links down there to other tools I use.
By the way, you don’t need a CNC or Laser. Just find somebody who has really good penmanship, give them a paint pen and have them scroll out the names.

Layout
I’m going to assume you are going to make these Arrow of Light plaques for your entire den. That means you need to make a template. First you will need a 24” long x 8-7/8” piece of 3/4” Plywood. This is the basis of your template. The next thing to do is select a bit and bushing. I suggest you use a PORTER-CABLE Router Bushing, 5/8-Inch OD/17/32″ ID. This means that the width dimensions shown in the sketch will need to be about 1/16” larger. And you will also need two 3/4” x 3/4” x 24” pieces for the rails.

To start, you will need to layout the actual width of the plaque on the template. Mark a centerline across the width and the length. Then mark a line across the top and bottom 3/ 4” in from the edge. Then strike a second line 1-1/ 4” in from the top and bottom. The first lines are the width of the plaque, and the second set of lines are the setback for the Sunburst and CNC lettering. Next, layout the sunburst using a trammel or a circle jig. I used a “Faring Stick”. You can see it in the video but, it s nothing more than a 3/4” wide by 3/16” thick by 36” long piece of defect free pine. Drop in a nail at each end of the curve and a third one in the middle on the arc and gently bend the Faring Stick between all three points, then mark it. Do it twice and you have the base of your sunburst. Next, mark the rays by marking tangent to the curve and marking out seven rays, 11/16” wide, equally spaced. All of the sunburst rays will extend to the closest setback line. This keeps them a 1/2” from the edge and prevents chip out.

Once you have completed the sunburst, use the dimensions below to lay out the arrow. Be sure you account for the 5/8” radius bushing at the arrow tip or plan on chiseling out the point.

Cutting the Template Pattern
I’m not normally a jig and fixture guy. I really hate making something to make something – it just seems like such a waste of my limited time. But, in this case I plan to make a stack of these Arrow of Light plaques so having a template will seriously reduce the time it takes to make them and it is repeatable. To make your own template, first you need to cut the pattern out. I used a bandsaw and filled the saw kerfs with slivers of wood and some glue. You can easily use a jigsaw to accomplish this task. The critical factor in cutting the pattern is accuracy. Cut slow and accurate. After cutting you may need to use a file to true up the surfaces. You don’t want any waves or bumps as these will show up when you rout the blank. Also, the bushing should slide smoothly throughout the pattern. The last cuts you need to make are the two 3/4” x 3/4” x 24” pieces for the rails. I used a couple of scrap pieces, and you might have something at hand in your scrap bin too.
Assemble the Template
Once you have the pattern cut out and smoothed you are ready to assemble the template. All you need to do is to glue and clamp the rails to the pattern using spring clamps. BE SURE you put a blank plaque into it to set the rail distance. Remove the blank once everything is clamped and clean up any glue squeeze out.
Router Setup
Let’s talk about the router setup. I’m using a Porter Cable 690 and a Porter Cable Bushing Set. This is a nine-piece set with seven bushings and two retention rings. I suggest a 5/8” OD bushing and use it to make sure it will clear throughout the template.
SAFETY TIP: MAKE SURE YOUR ROUTER IS UNPLUGGED.
I suggest a 1-1/2 horse or better router with a plunge base. And a 1/2″ Core Box Bit. My bit is a 1/2-inch Shank which allows for more torque and can hog out more material faster with less stress on the bit. It also has better heat dissipation and reduces burning.


Next you will need to set the router depth. First get a couple of 1/4inch by about 3/4-inch pieces of scrap somewhere near 24 inches long. Drop these on one of your blanks and put the template on. You should have a 1/4-inch space between the bottom of the template and the top face of the blank. Next loosen the plunge stop rod – it’s the long thing with a little knob to lock it in place. You can ignore the turret as we will make only one pass. With your bit and bushing installed, release the plunge lever and plunge it down until it touches the blank then release the lever. Finally, making sure the stop rod is touching one of the turret posts, lock the stop rod in place.

Template Routing
Let’s set up the blanks to rout. First mark a vertical centerline on each of your blanks. Your template should have a vertical centerline from your initial layout. Lay the template on your blank and align the centerlines. Your choice on how you want to secure the template to the blank. I used a couple of spring clamps which are fast and easy to install and remove.
OK, now you can plug your router in.
If you have never used a plunge router, it can be a bit tricky at first. In our case. Once your bit and bushing are installed, place the router bushing into the pattern. Then turn on the router and flip the plunge lever. Push the router down firmly and release the lever. This locks the router at the depth you set. Now firmly follow the pattern. DO NOT force the router, let it cut. At the end BEFORE you pull the router out, release the plunge lever to raise the router then turn it off. Take a look at your work. If the pattern was a bit wide you may need to make another pass or two to clean it up.

Personalization
Your Moms and Dads really love personalization and there are multiple ways you can personalize these Arrow of Light plaques. The easiest is to find someone with good penmanship and give them a paint pen. If you want it in cursive, you may need to ask Grandma to do it. Choosing this route, you should apply the name after the first coat of finish is applied and sanded out. Then the next coat will protect the paint.
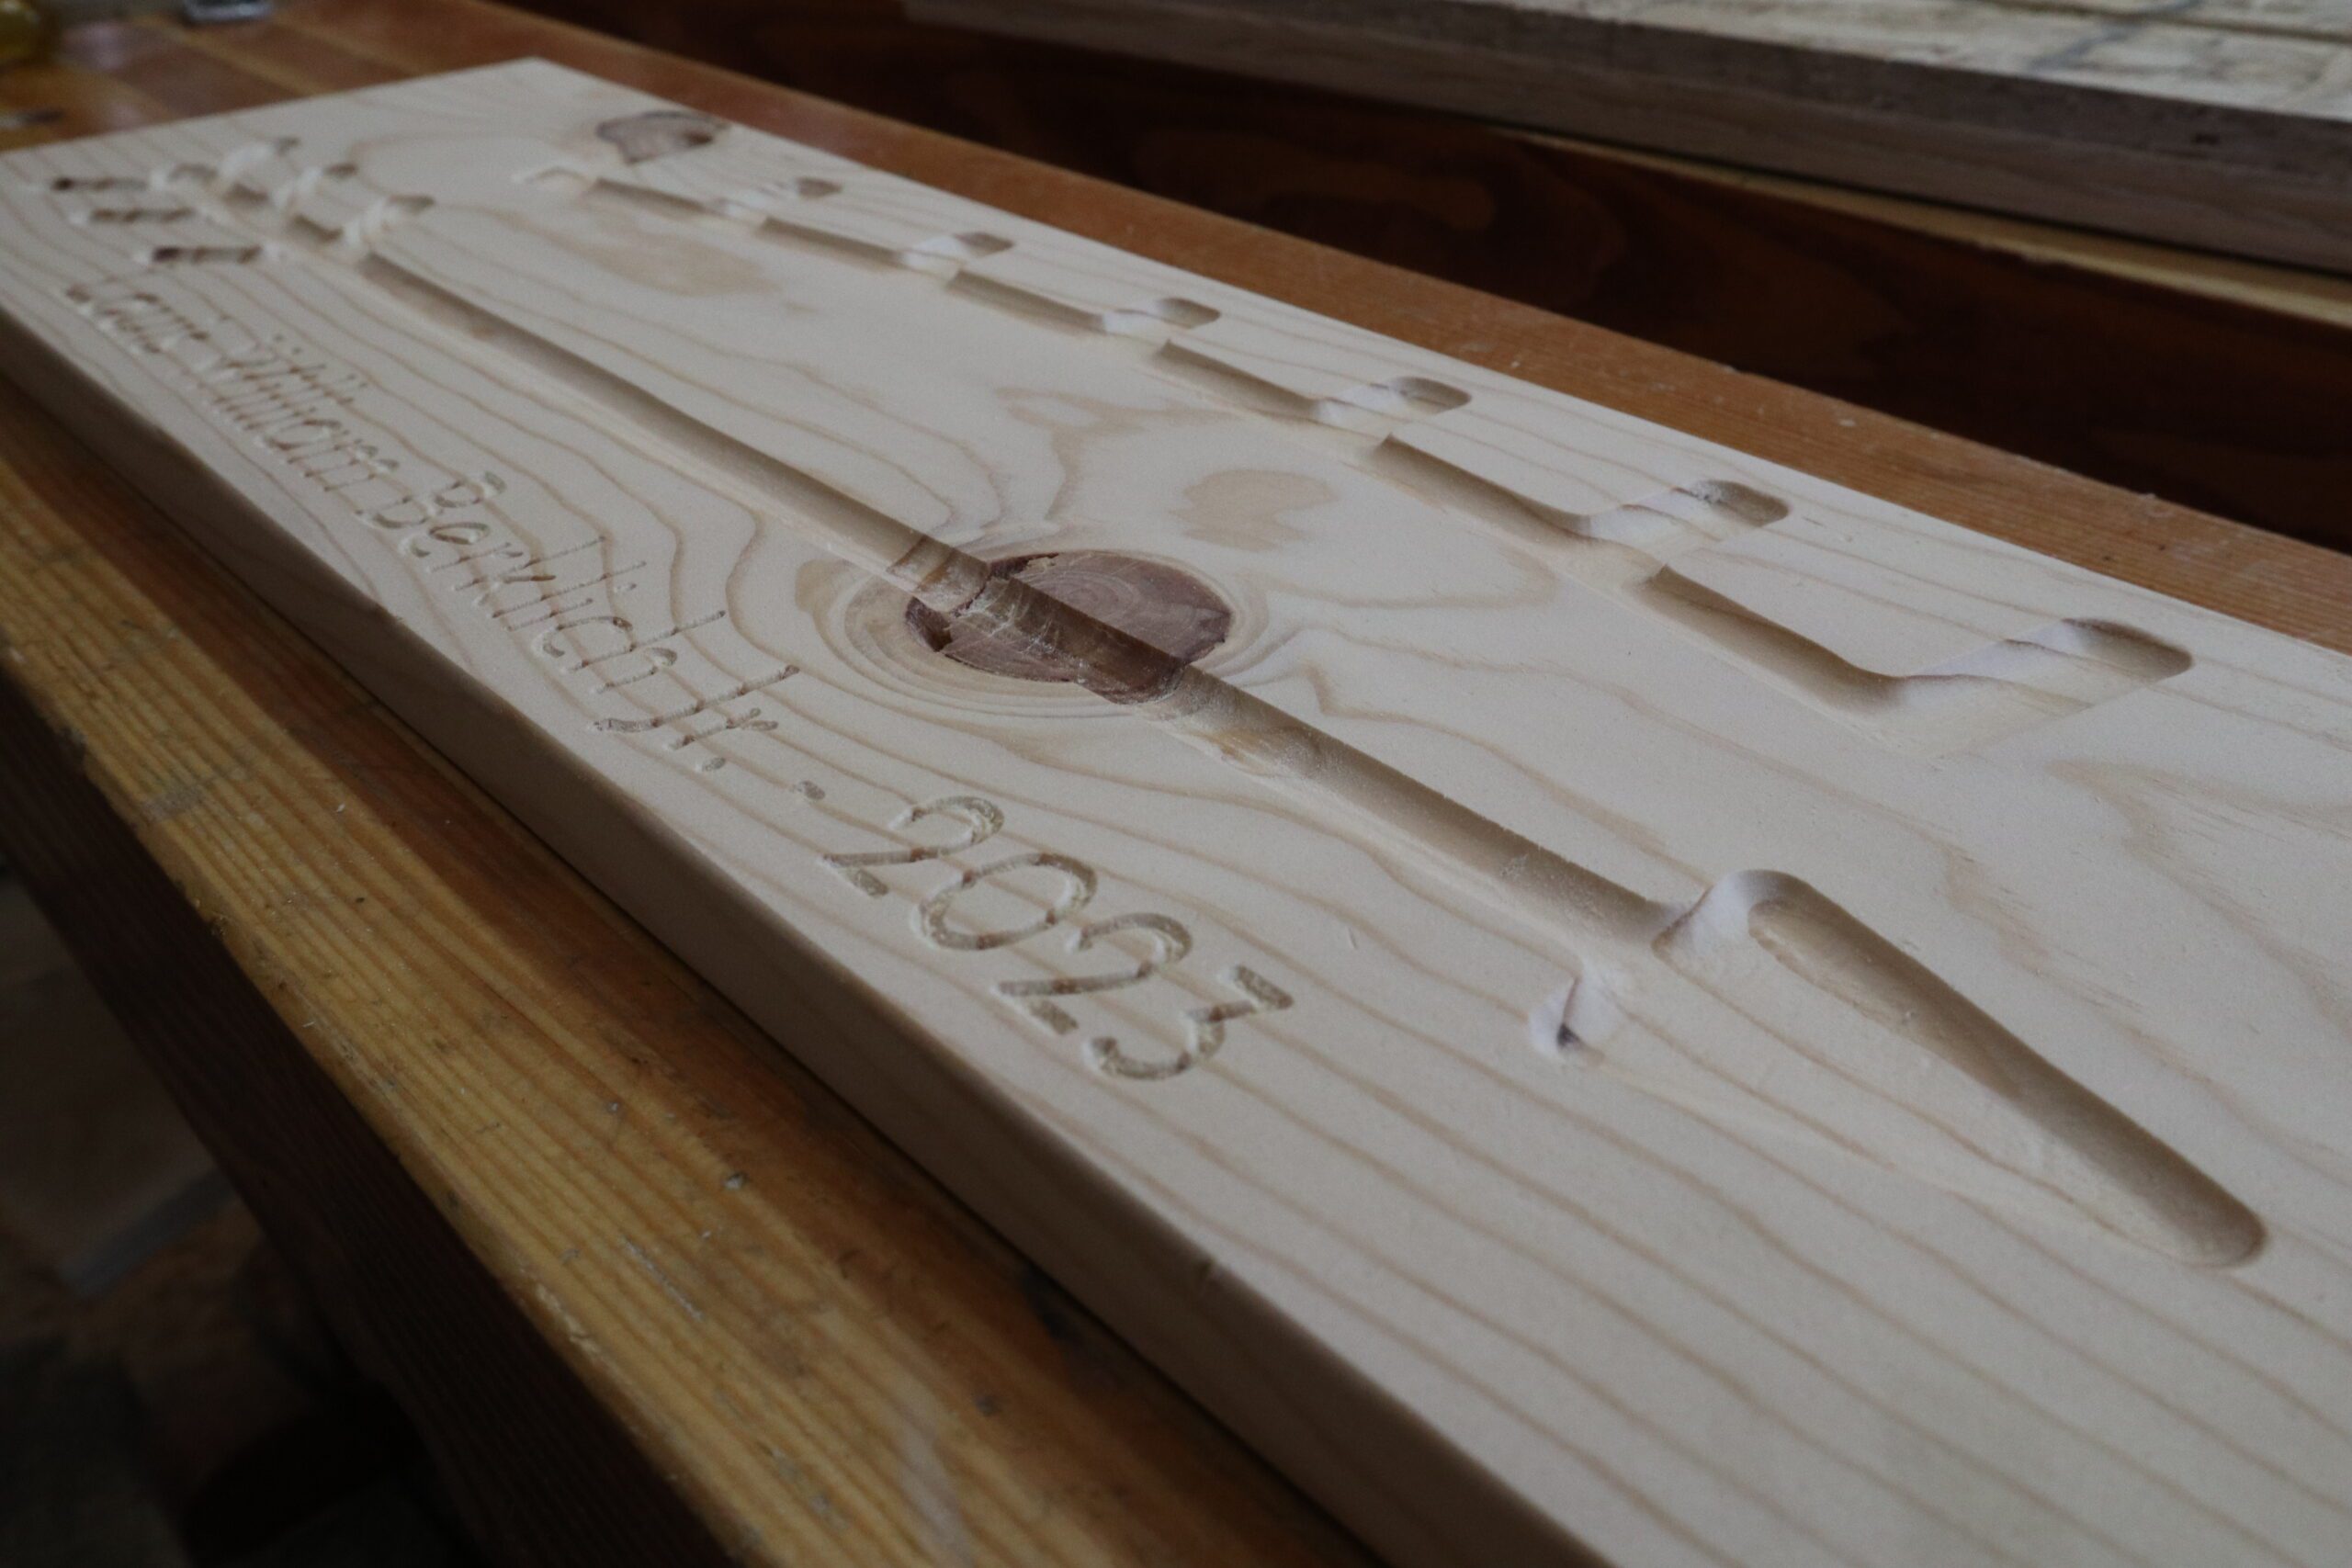
If you are choosing to personalize with a CNC or laser instead, do it now. I used a Fox Alien Masurter CNC with a 65-watt spindle and 1/16 inch spiral up-cut bit. And Easel software from Inventables for the lettering and g-code compiling. The lettering is 1-1/4 inches high with the letter bottom 1/2 inch above the bottom edge and centered left to right. All of this works with the Josefin Font which is a stock font for the free version of Easel. I won’t go into any more on CNC/Laser because I presume that you probably don’t have one. I will leave it at – the Fox Alien is fairly inexpensive, easy to assemble, and very easy to use. Also, you can swap the CNC Spindle for a Laser too.

Sanding
You may need to do a little bit of clean up with the sandpaper at the bottom and along the edge depending on the accuracy of the template. Simply fold a piece of 150 grit sandpaper and smooth out all the routed areas. If you do have any waves and bumps you may need to start with 80 grit to sand those out, then move on to the 150 grit. Next, take 220 grit on you orbital sander and give everything a really good sanding including the edges. You are using pine so the 220 grit will make short work of any rough spots.

Edge Routing
Now you need to round all the edges. You can either sand the sharp corners or use a router with an 1/8 inch round over bit. Either way your goal is the have all soft edges.

Finishing
For finishing the of these Arrow of Light plaques, I usually leave it up to the parents. Everyone wants something different, so I let them do it. But if you are going to do it for the entire den then start with giving each a good wipe down followed by a coat of spray lacquer followed by a light sanding with 320 to remove any nibs. This will seal it and still allow you to apply latex paint to the letters. Wipe it down again and then using an Artist’s brush paint the sunburst yellow, the arrow blue, and the name black. You can get 1/2 pint jars of latex paint in these colors at the big box stores for a couple of dollars and you really are not using much of these paints. Once the latex is dry you can rub off any slop and if that doesn’t work you can give it a quick spot sanding.
Now you can apply the final finish. I usually use a Minwax satin polyurethane varnish or you can apply a couple of coats of a spray lacquer.
Project Complete
The Arrow of Light plaque for Cub Scouts is a great little project, especially if you are doing it for the entire den. Mom’s and Dad’s will love it and you will be the hero of the day.
I will tell you it’s not a 30 minute project, especially if you’re going to make the template. The template is going to take you 40-50 minutes alone. Once your template is built though, these things pop out in a matter of minutes. And it took me about 10 minutes per run for each one of these names on the CNC.
Hopefully you have a chance to do this project and if you do, I’d like to see it. It is really fast and easy and you can impress everyone in the Den with your awesome woodworking skills.

If you do make this project, post it in my my Facebook page. I’d love to see your work.
Hope you got something out of this and if you did, do me a favor, hit like and subscribe. I’d appreciate that a lot.
Thanks for reading and until next time Good Making!
Bill
Visit my Etsy Store at www.etsy.com/shop/30MinuteWoodshop
Facebook https://www.facebook.com/30MinuteWoodshop
Links to my Videos and Blogs
DIY Whiskey and Cigar Butler https://30minutewoodshop.com/?p=550
Farmhouse Key Rack https://youtu.be/I65FGq4dKYY
Create Your Own Lazy Susan https://30minutewoodshop.com/?p=491
Tools and Materials you may need
DEWALT Router Plunge Base Kit https://amzn.to/3LKkJEK
Router Bushing Set https://amzn.to/3HMl8pd
1/2″ Core Box Bit https://amzn.to/3LZ1WqI
Pony Spring Clamps https://amzn.to/42a6GPR
Milwaukee M18 Jig Saw Kit https://amzn.to/3FAWXsS
BOSCH Compound Miter Saw https://amzn.to/421A1vl
Minwax Fast Drying Polyurethane https://amzn.to/3V5h0pO
Minwax Finishing Wax https://amzn.to/3Hfndtq
Minwax Spary Lacquer https://amzn.to/3VP6GT9
PPE Gear
3M N95 PPE Mask https://amzn.to/3x4NGEu
ISOtunes Bluetooth Earmuffs https://amzn.to/3lpj1iA