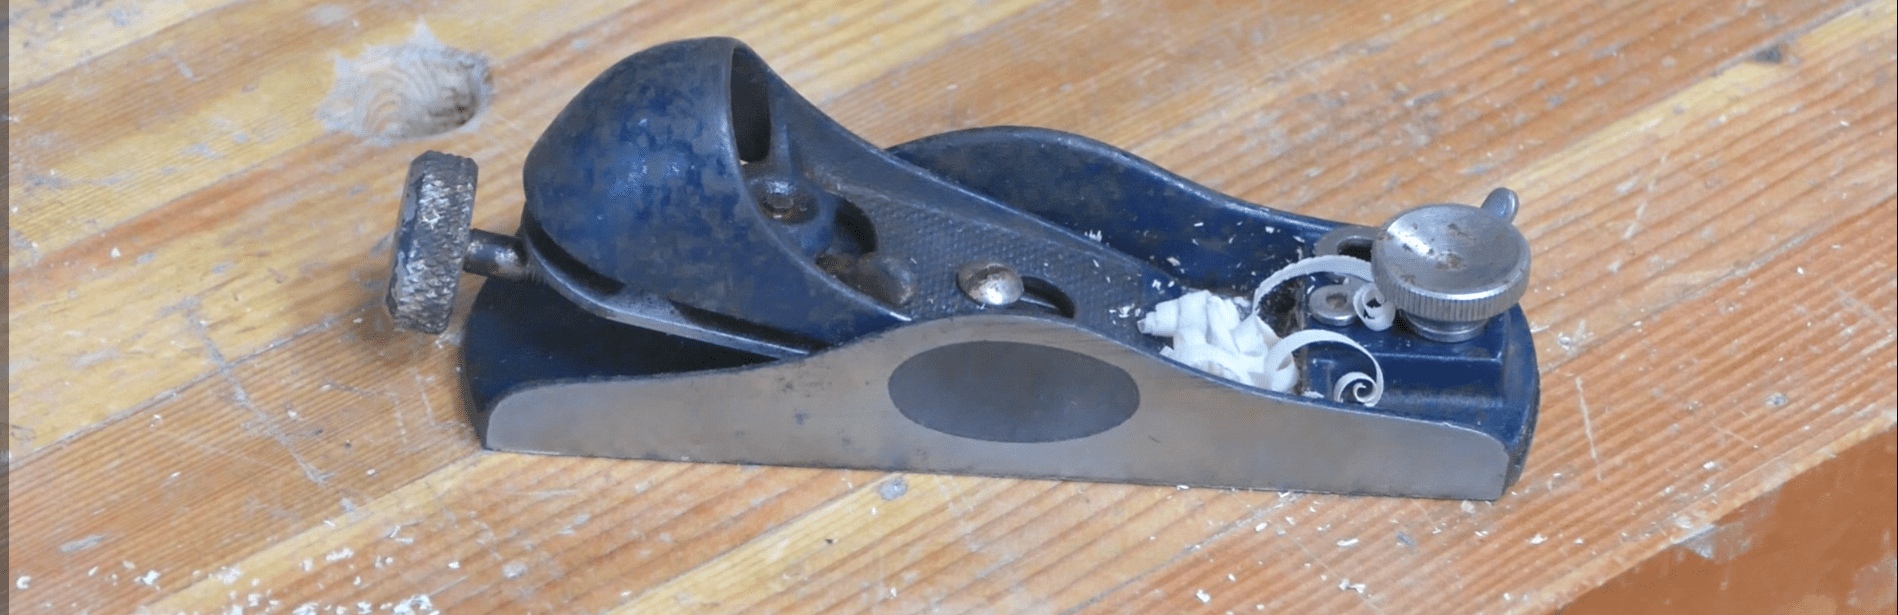

Here is an easy reconditioning of a rusty Stanley #60-1/2 Block Plane. I’m always amazed and a bit jealous of the guys who find these super tool deals on a Stanley #2 for $100 or an 1840s Rosewood and Ivory plow plane. Those things that are out there somewhere but I never seem to find them. I did, however, stumble across a Stanley 60 1/2 block plane in pretty bad condition. I was hanging out at the Midland Antique Fair with my wife and quite frankly there really wasn’t much on display most of it was just garage sale junk. But one guy had a small stall and a few things laying around and he had this #60 that was pretty rusted up for 4 bucks. I literally could not pass that up. I figured what the heck even if it’s only a paperweight it’s worth the $4.00. I paid the man tossed it in the bag and then eventually headed home.

A couple days later I took it out and they actually looked at it. Though it looked pretty bad it turned out most of the rust was really surface rust. Like it had been left out for a couple of days in the dew which a lot of these guys out there do. They’ll come in on a Thursday throw everything out and leave it uncovered for three days.
I have to say looking at it and seeing it was really just surface rust and I couldn’t see any serious pitting got me really excited. So here’s how I went ahead and did a restoration on this #60-1/2 though, restoration probably is a strong word.
Tools and Materials
Like any tool that needs to be recovered you’ll need a few things. Mostly to start you’ll need penetrating oil and have a screwdriver, small brass wire brush, and maybe an ice pick to dig a few things out. I used Liquid Wrench to loosen everything up. And, some 100, 220, and maybe even 320 grit wet-dry sand paper.
You will also need plenty of paper towels and probably a towel or mat to work on because liquid wrench gets everywhere. A pair of nitrile gloves would help too.
Disassembly and Inspection
The first thing I did was to spray everything with liquid wrench and let it sit for a day and half. This gave it time to soak in and loosen things up. With that done I started unscrewing all the parts and doing a general inspection to see how bad things really were. The bottom looked pretty awful. It most likely was sitting in a puddle of water for several days.
Looking over all the parts, everything was there. Additionally, none of the parts seemed to be particularly damaged or worn. That’s a really good sign when you’re buying an old tool. Many times you’ll find broken handles, cracked bodies, and chipped feet and mouths as well as stripped screws.

Initial Cleaning
If this had been in much worse condition I may have done some electrolysis or something to help clean off some of the rust however for the condition it was in I decided to go straight to sanding. I started standing with 100 grit drywall paper lubed with penetrating oil. And all I did was set it on a piece of pine and just start rubbing the bottom until I could actually cut through all the rust. This took a fair amount of elbow grease and time. Once the bottom was pretty well cleaned up I did both sides. With those done I did a bit of concentration on the foot.


The rough sanding out of the way I grabbed my granite plate and some 220-grit wet-dry sandpaper. My granite plate is a 12×12 granite tile from the big box store. It’s plenty flat enough for any honing or flattening. With the sandpaper thoroughly soaked I started in on removing all the scratches and flattening the bottom..
Again this took a fair amount of elbow grease and time which wasn’t unexpected. But the further I went along the more I realized there was no significant pitting at all on the sides or the bottom. Not even the foot. At this point I was considering myself very lucky.

The sides and bottom sanded out and flattened I started working on the edges and the foot bed with a brass brush and some 220 grit sandpaper. That made short work of any rust or rough spots and it ensured a good seat for the foot.
Once the body and foot were taken care of, I went through the same process with the blade which was in the exact same condition primarily a surface rust. The 100 grit we’re penetrating oil Took off all the surface rust in the 220 took off the scratches. I didn’t work long enough to get rid of all the stains however but this is a user tool not one for showcase so I’m OK with that.
I use my diamond stones to sharpen and polish the blade and got it ready for later installation.
Washing and Drying
I continued with the brass brush and penetrating oil on the rest of the parts and the inside of the body. This got rid of almost all the surface rust and they discovered that there was still about 50% of the paint left. I did have to take a little more sandpaper to the mouth and the blade seat to ensure the plane blade was bedded properly.
With everything cleaned up and 99% of the rust off I gave all the parts a bath and soapy water to get rid of all the penetrating oil. That also got rid of a lot of the excess dirt that was still clinging to the body and the parts. I dried everything off and using a compressor to blow off the threaded holes because I certainly don’t want the parts to rust together once I’ve assembled them.


Assembly
Once the parts were clean and dry they were ready to go back together. I use 3 in 1 oil on all the parts and in all the threaded holes and on the threads to make sure everything had a nice coat of oil. I wiped off all the excess because it only takes a thin coat of oil to be effective. Oil collects dirt. With that done I assembled the parts slid the blade in, clamped it down, and adjusted it.

With a little bit of back and forth on the adjustment I got it tuned up and cutting very nicely.

Wrapping it up
So this was definitely a different project from the ones that I do. I will say that recovering this plane was a lot of fun and I’ll be on the lookout for more tools that I can do this too. I did notice one thing though I have several block planes and there’s a several differences. It’s the blue one in the middle Specifically I have a Record #60 1/2 which is bigger than the Stanley #60 ½, I had no idea. The Record #60 ½ has been my go-to plane for quite some time and I use it for all kinds of things. So I’m thinking the Stanley is going to be very much the same way. I am super happy that I found this and I was able to bring it back into condition to be used and add it to my stable of planes. I even have a place for it in my tool cabinet.
I hope this gives you the idea that you could actually go ahead and and recover old tools so next time you’re out at a flea market or an antique fair and you find a good deal on a tool maybe you’ll pick it up and bring it back to life.

Hope you got something out of this and if you did, do me a favor, hit like and subscribe. I’d appreciate that a lot.
Thanks for reading and until next time Good Making!
Bill
Visit my Etsy Store at www.etsy.com/shop/30MinuteWoodshop
Facebook https://www.facebook.com/30MinuteWoodshop
Links to my Videos and Blogs
Create Your Own Dice Vault https://30minutewoodshop.com/?p=1226
DIY Whiskey and Cigar Butler https://30minutewoodshop.com/?p=550
Farmhouse Key Rack https://youtu.be/I65FGq4dKYY
Create Your Own Lazy Susan https://30minutewoodshop.com/?p=491
Tools and Materials you may need
Milwaukee M18 Fuel 2-Tool Combo KIT https://amzn.to/4l7vAsc
Milwaukee M18 Jig Saw Kit https://amzn.to/3FAWXsS
Ridgid Oscillating Belt Sander https://amzn.to/45C3rTK
Starrett Combination Square https://amzn.to/3XpbrDN
WoodRiver Low Angle Block Plane https://amzn.to/3pkNvos
BOSCH Compound Miter Saw https://amzn.to/421A1vl
Minwax Fast Drying Polyurethane https://amzn.to/3V5h0pO
PPE Gear
3M N95 PPE Mask https://amzn.to/3x4NGEu
ISOtunes Bluetooth Earmuffs https://amzn.to/3lpj1iA