
Here is a really simple and kid-friendly Holiday Christmas Lantern. The problem with most Luminaire lanterns you see on YouTube is there actually 1 trick ponies. You make it once and that’s all you’ve got. This Christmas Lantern however features interchangeable panels that are easy to make and easy to change. This project is so easy that all you need to do this chop up a piece of wood, put in some grooves, add a back and cut out the front and you’re ready to go. The true beauty of this project is that it is really kid friendly. You can nail this together, screw it together, or even just glue it. Now the kids can participate in the assembly, and they’ll have fun doing it. And as far as the panel If you use wood the kids could cut it out on a scroll saw which is very very safe or you can use cardboard and have them cut the design out in the cardboard. You can even create a frame and have the kids cut out their designs in heavy construction paper then glue it on. This is so easy and so fun the kids can make a new one every night and put it on display. So, if you have grandkids or kids this might be the perfect project for tomorrow night.

[Youtube Embed]
Tools and Materials
This project doesn’t take a lot of materials. I started with a single fence picket. I also had a piece of quarter inch plywood for the back and one for the front.

Layout
Very little layout as it is a simple project. Just mark you pieces and be sure you account for the saw blade thickness


Cutting To Length
First up in making this whole project is to cut all the pieces to length. You could do that on a table saw, a radial arm saw, or a compound miter saw. This is so easy you can even use a handsaw. I used the Radial Arm Saw.

Cutting Dados
With that done you will need to make the grooves or the dados so you can slip in the panels. These are really nothing more than 1/4 inch wide by 1/4 inch deep grooves in each of the pieces. The easy way to cut these is on a table saw and make two or three passes depending on the thickness of your blade. Be sure that it will fit 1/4 inch piece of plywood. With maybe a little bit of clearance. I used brass setup gages to make the job go faster.


Assembly
Assembly for this is very simple pull the pieces together and screw or or nail them together. I used glue and nails on this because I don’t intend this to last a lifetime. If I get 8 or 9 good years out of it that would be fine. This particular piece is going to sit outside for possibly two weeks and may see a little bit of rain or snow so it’s really not going to be out in the weather very much at all. Therefore, no reason to take extraordinary measures.
Once you have the box glued and nailed together flip it over and put the back on if you used a rabbet measure and cut the back to match the rabbet. The rabbet really helps kids because it positions the back and makes it easy for them to nail it down. I just positioned it and glued and nailed it in place.


Applying Finish
I did apply a frost of white using rattle can paint just so it blends in with the snow.
Lining the Box
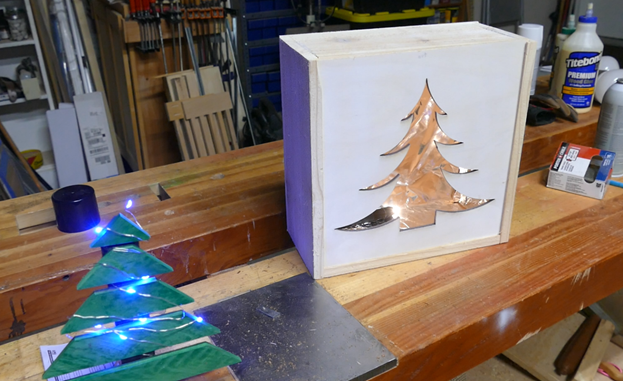
Here’s a little trick that I think makes this different than all the rest too. Line the box with some aluminum foil. This will allow most of the light to exit the box and not get absorbed by the wood. It should make the whole thing brighter.
The easy way to do this get some 3M spray adhesive and spray it into the box then push the aluminum foil in. Don’t worry too much about making it perfect.

Cutting the Panel and painting
With all that done all we need to do is cut the front panel. Now as I said you could use 1/4 inch piece of plywood and then use the scroll saw or coping saw to cut out your pattern. This is a great way to get the kids involved with tools without any danger. Scroll saws are easy to use it really can’t hurt you. Though the kids may break several blades trying to get around the corners.
The alternative that I used for this project was just to cut my design out directly from wood with my Laser. By the way cardboard is cheap easy to cut and easy to dispose of so it’s perfect for the kids though you may want to watch the little fingers around sharp knife. By the way if the kids are too young you could just cut a frame either in plywood or in cardboard and then have the kids cut their designs out with the scissors in heavy construction paper and then paste it directly to the frame.

Well this has been a really cool project. Super quick, super easy, and super kid friendly. Hopefully you get a chance to give this a try and do some woodwork with your kids or grandkids. It will be something they can point to and say “I did that”.

Hope you got something out of this and if you did, do me a favor, hit like and subscribe. I’d appreciate that a lot.
Thanks for reading and until next time Good Making!
Bill
Visit my Etsy Store at www.etsy.com/shop/30MinuteWoodshop
Facebook https://www.facebook.com/30MinuteWoodshop
Links to my Videos and Blogs
Create Your Own Dice Vault https://30minutewoodshop.com/?p=1226
DIY Whiskey and Cigar Butler https://30minutewoodshop.com/?p=550
Farmhouse Key Rack https://youtu.be/I65FGq4dKYY
Create Your Own Lazy Susan https://30minutewoodshop.com/?p=491
Tools and Materials you may need
Brass Setup bars – set of 11 https://amzn.to/4ank7mK
Ridgid Oscillating Belt Sander https://amzn.to/45C3rTK
Starrett Cobination Square https://amzn.to/3XpbrDN
WoodRiver Low Angle Block Plane https://amzn.to/3pkNvos
Milwaukee M18 Jig Saw Kit https://amzn.to/3FAWXsS
BOSCH Compound Miter Saw https://amzn.to/421A1vl
Minwax Fast Drying Polyurethane https://amzn.to/3V5h0pO
PPE Gear
3M N95 PPE Mask https://amzn.to/3x4NGEu
ISOtunes Bluetooth Earmuffs https://amzn.to/3lpj1iA