
Here is a small shelf that you can make very easily to grow herbs over the winter. My son is in a small apartment, and he is looking for a way to grow some herbs this winter. So, he needs a shelf and most likely he’ll put a grow light on it to help things along. This shelf really doesn’t take a lot of tools or a lot of time. And it uses common dimensional lumber period. So grab your hammer and saw and get ready for winter.
Tools and Materials
OK really, for this project you’re only going to need a square a measuring tape some clamps, hammer, and a saw. I suggest a circle saw but you could use a handsaw – it’ll just take a little longer. Oh, you’ll need a Router also with a three-quarter inch straight cut bit. And an orbital Sander with 220 grit sandpaper. For materials you’re going to need five 6 foot long 1x6s. And of course, the finish of your choice.


Layout
Almost all the way out to this project. You just need to decide where you’re putting your shelves and if you’re following the dimension sketch below that should be very easy take your left and right boards clap them together then mark the shelf location simultaneously across both.


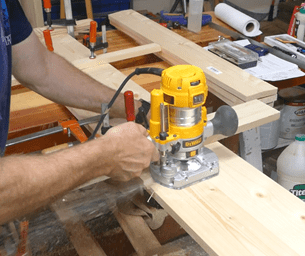
Routing the Dados
With the parts clamped together now is the time to route the dados. I would suggest that you set up a fence for each one and use that as a guide to ensure the dados are routed correctly. Setr your bit depth to 3/8” which is half of ¾”, the thickness of the material you are using.

Cutting
Go ahead and cross cut 2 of your boards into 3 foot long pieces be sure all four pieces are exactly the same length. At this point you should also cut a toe kick 3 inches wide And three feet long.

Sanding
With everything cut use your orbital Sander and 220 grit sandpaper to sand everything nice and smooth including the edges.

Assembly
If you have routed everything identically, and cut everything to the same length assembly will be very easy. Apply glue to the date I was on one side and insert Repeat the process for the other side. All the shelves. You may have to actually clamp everything together but if you do so do it next to the shelves.
With everything in place make sure that your assembly is square and put 3 nails for each shelf end. This will hold everything in place when you take the clamps off.
With the shelves assembled go ahead mark your toe kick and cut the piece to fit. Then install with glue and nails.
Finally you probably should attach 2 feet the feet are about 16 inches long one on each side centered and you can cut curves or whatever you care to to make them look fancy. These feet should keep and keep it from swaying around the shelf upright.


Edge routing
Now that you have everything assembled take your router within 1/8 inch roundover bit and round all the edges. This will make it much easier and softer when someone touches
Finishing
With everything assembled sanding should be done but you may want to take a piece of sandpaper, 220 grit, and just dust all the corners. Then you can apply your finish of choice. A good semi gloss exterior latex would be perfect for this project because it will be generally impervious to any water that might get on it from the plants. Also it is easy to apply and very easy to clean up.
Well at this point I think your project is done. I know mine is. Though I will say my son will be putting the finish on for himself later on.

If you do make this project, congratulations on a job well done. And do me a favor and post it on my Facebook page (see link below).
Hope you got something out of this and if you did, do me a favor, hit like and subscribe. I’d appreciate that a lot.
Thanks for reading and until next time Good Making!
Bill
Visit my Etsy Store at www.etsy.com/shop/30MinuteWoodshop
Facebook https://www.facebook.com/30MinuteWoodshop
Links to my Videos and Blogs
Create Your Own Dice Vault https://30minutewoodshop.com/?p=1226
DIY Whiskey and Cigar Butler https://30minutewoodshop.com/?p=550
Farmhouse Key Rack https://youtu.be/I65FGq4dKYY
Create Your Own Lazy Susan https://30minutewoodshop.com/?p=491
Tools and Materials You May Need
Starrett Combination Square https://amzn.to/3XpbrDN
WoodRiver Low Angle Block Plane https://amzn.to/3pkNvos
Milwaukee M18 Jig Saw Kit https://amzn.to/3FAWXsS
Milwaukee M18 Circular Saw Kit https://amzn.to/45kvLdL
Milwaukee’s M18 Compact Router https://amzn.to/4oh0pxm
Milwaukee M12 Detail Sander https://amzn.to/46I6tss
Bostitch Nailer and Compressor Combo Kit https://amzn.to/3HsfXO6
Bostitch 18 GA Brad Nails (900) https://amzn.to/3Hopnu4
Kreg K4 Pocket Hole Jig https://amzn.to/45bxFgQ
Ridgid Oscillating Belt Sander https://amzn.to/45C3rTK
BOSCH Compound Miter Saw https://amzn.to/421A1vl
Minwax Fast Drying Polyurethane https://amzn.to/3V5h0pO
PPE Gear
3M N95 PPE Mask https://amzn.to/3x4NGEu
ISOtunes Bluetooth Earmuffs https://amzn.to/3lpj1iA