
So I usually make all my shop carts and stands myself. But there are times when you just don’t have the time to do it. I’m in that position at the moment and so I went online and purchased a Rockler Rock Steady Shop Stand. I purchased this stand because I needed a place to put my 16-32 Performax Sander. It’s been hanging out on my utility belt Sander stand for quite some time now which meant the belt Sander was relegated to the floor. That made both tools difficult to access and hard to use. The Rock Steady Shop Stand it was a good solution in terms of both the speed of the build as well as utility. So I’m not going to go through all my new steps in doing the assembly process because really this is just a bolt go. Links are at the bottom.

Tools and Materials
You need a couple of things to build this shop stand. 1st of course you need to purchase a Rockler Rock Steady shop stand kit. I bought not only the kit but I also bought a set of casters for it. Next, you’re going to need some 2x6s and 2x8s to make it top you could also use 2x4s.

Assembling the Rock Steady Shop Stand
Now I don’t normally read the directions, but I wanted to know their recommendation as far as putting in the adjustable feet or in my case the casters in other words those go on first or last. Rockler recommends doing it as one of the very first operations.
Following the instructions I bolted on the casters then I bolted the ends together. The only critical step in the process is to make sure that you use a framing square to square the ends. I did use an impact driver to drive all the nuts with the exception of one or two where I needed to use an open end wrench.
With the ensemble I continued by bolting down the upper and lower stringers for both the front and the back. Again critical to make sure that it you use a framing square and make sure everything is square.
This whole process took me about 1/2 an hour.


Cutting and Jointing
My next step was to crosscut all my top pieces, the 2x6s and 2x8s to 42 inches long. But the pieces cut I went over to my jointer and I jointed all the edges. This gave me a really nice glue line. It’s important for this project because I am depending on the glue to hold the top together. The top is supported along the sides and along the edges with plenty of screws too.

Glue Up
With everything jointed I edge glued all the pieces together then clamped them firmly. I waited about a day to make sure all the glue was thoroughly dried. Then I went ahead using a homemade bull nose plane I peeled off all the glue nibs from the squeeze out.

Because I took care during the glue up to ensure all the pieces were even I didn’t have to do any sanding.
Additionally, because I’m using this as a shop cart I am not putting any finish on the top.
Final Assembly
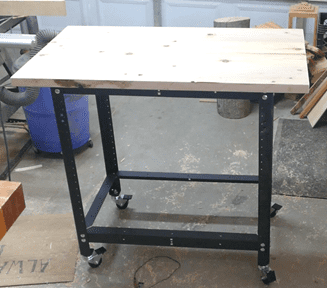
With the top finished I placed it on top of the bench and then placed the shop stand on top upside down. I know I could have done it by driving the screws from the bottom up but this just seemed like a much easier idea to me. And it doesn’t really weigh that much. I centered the shop stand on the top and then Jose drove a series of #14 one-inch panhead screws into all the holes. This ensured that all parts had at least 2 screws.

With that done I flipped it over and of course I admired my work because it does look good. As this was to be used for my 16-32 Performax Sander I lifted that on to the shop cart and got it in position and secured.
I have to say having the Performax on the new shop stand makes it far more accessible and easier to use. This is just another one of those projects that I needed to do in order to help organize my shop better.

I highly recommend the Rockler Rock Steady Shop Stand and Casters because it really is rock steady.
Hope you got something out of this and if you did, do me a favor, hit like and subscribe. I’d appreciate that a lot.
Thanks for reading and until next time Good Making!
Bill
Visit my Etsy Store at www.etsy.com/shop/30MinuteWoodshop
Facebook https://www.facebook.com/30MinuteWoodshop
Links to my Videos and Blogs
Create Your Own Dice Vault https://30minutewoodshop.com/?p=1226
DIY Whiskey and Cigar Butler https://30minutewoodshop.com/?p=550
Farmhouse Key Rack https://youtu.be/I65FGq4dKYY
Create Your Own Lazy Susan https://30minutewoodshop.com/?p=491
Tools and Materials you may need
Rock-Steady Shop Stand Kit https://amzn.to/4jIuYIF
Rockler Caster Set https://amzn.to/3ZWWv23
Ridgid Oscillating Belt Sander https://amzn.to/45C3rTK
Starrett Combination Square https://amzn.to/3XpbrDN
WoodRiver Low Angle Block Plane https://amzn.to/3pkNvos
Milwaukee M18 Jig Saw Kit https://amzn.to/3FAWXsS
BOSCH Compound Miter Saw https://amzn.to/421A1vl
Minwax Fast Drying Polyurethane https://amzn.to/3V5h0pO
PPE Gear
3M N95 PPE Mask https://amzn.to/3x4NGEu
ISOtunes Bluetooth Earmuffs https://amzn.to/3lpj1iA