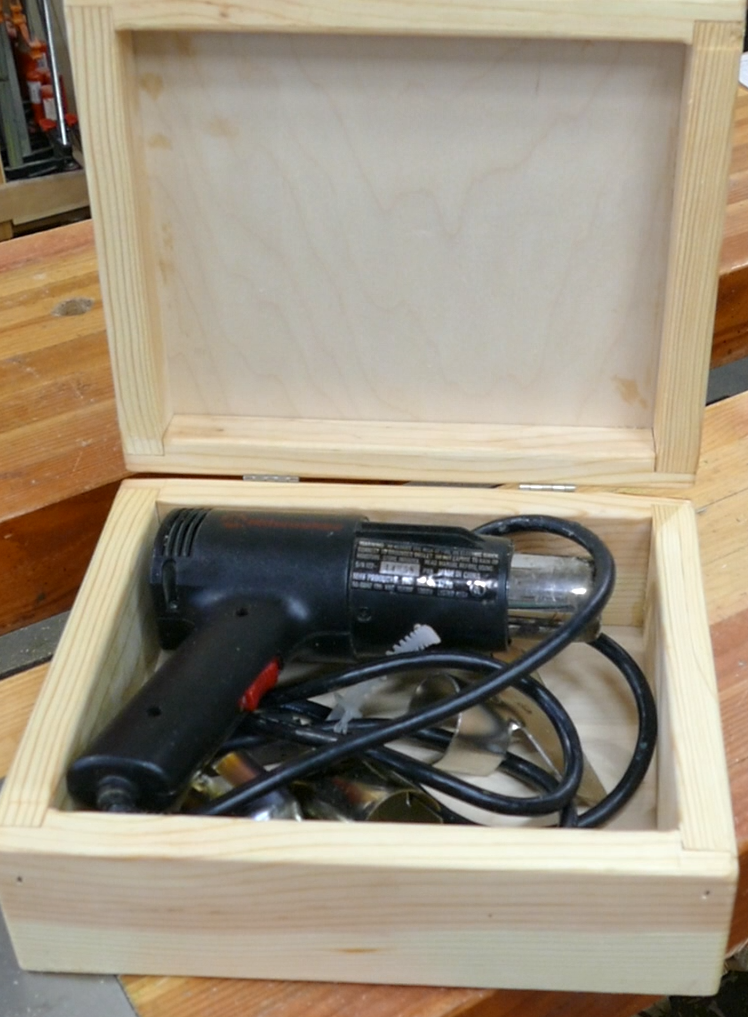

I have a Milwaukee heat gun. It’s resided in its black plastic box for many years but the box finally failed. I decided to make a new one. This is a super easy little toolbox that can be put together in about 30 to 40 minutes and provide storage for anything that you need. This is really a beginner project and super easy to do.
Tools and Materials
I used pine as the prime material for this box. I had several pieces of 14 inch long 1×10 laying around along with a piece of quarter inch Maple plywood. This proved more than sufficient to get the job done.
With regard to tools, I used a radial arm saw and a table saw along with my router and my orbital Sander. You could do this whole job with hand tools – basically a saw and a chisel, though the rabbits might take a little more work. That’s one of the reasons this is a 30 minute workshop project because I can get it done very quickly with power tools and that’s really my goal.


Layout
Layout for this project is super easy the big thing is ripping the pieces to the correct width and then cross cutting.

[layout]
Cutting
For me, on this project, the first thing I did was to rip the pieces to the correct width which is 4 1/4 inches. I did this on my table saw which made it very quick.
The next step was to cross cut all the pieces to length. In my case I followed the drawing. Be sure if you’re using the dimension sketch that’s provided, that you check all your dimensions to make sure your tools will fit in the box when you’re done. I could have used an additional half inch in the front to back dimension but that was primarily because I changed my mind halfway through and went from a straight butt joint to a dado joint at the corners. I lost 3/4 of an inch which made it a bit tight. But it still works.


Cutting the Rabbets
The next step in this process is to cut the rabbets. You could do this with a dado blade I chose to use my regular saw blade on my table saw and just nibble away which took 3 or 4 very quick passes to make the rabbets necessary for the top and the bottom to sit in. You could completely avoid making these by just gluing the top and bottom directly on and not recessing them into the wood. I just happen to like the aesthetic a recess panel.


With the blade still set to the appropriate height you can create the rabbets in the front and back pieces on both ends to accommodate the end pieces. These take a bit more time because they are 3/4 of an inch wide so you have to nibble a little bit more. When you’re done with this step be sure you check to make sure it’s flat you may need to take a chisel and clean up a little bit.


Assembling the Box
If you have taken care in making the parts they should all be identical and the correct dimensions so glue up is very very easy. I chose a 2-step assembly process for this point. I started by gluing the front and back together with the sides clamping that and then throwing some nails in because I didn’t really want to wait for the glue to dry. I use 16-gauge 2 inch nails to hold things together so I probably really didn’t need the glue. But hey. Applying glue to all the surfaces necessary and then clamping everything in place is fairly easy. Just be sure that you check that everything is square. Sometimes when you clamp it will twist the work piece and then you have to go back and figure out what happened. Part of the problem is overtightening the clamps so put enough force into the project but not so much you warp or bend the wood.
Note if you are going to use nails, strike a mark 1 1/4 inches below the top edge all around the box and do not nail along or anywhere in that line. I wasn’t thinking ahead and did that and ended up having to dig out of nail. Fortunately, I missed it with my table saw blade and didn’t ruin it.


Cutting and Fitting the Top and Bottom
The next step in this whole process is to cut and fit the top and the bottom. If everything is square it should be very easy to measure and cut then install the top and bottom. Take your measurements closely and if you want a very tight fit make it slightly oversized and then you can use a plane to trim off the edges until it just fits.

Assembling the Top and Bottom
Once everything is fit, you’ll need to apply some glue into the rabbit on the top and the bottom and fit the panels in. You can rely solely on glue for this because there’s a lot of glue area. Or you could add a few nails to keep everything in place. That’s the route that I chose. I used 5/8 inch by 18 gauge nails with my air nailer. I did this because I was in a hurry to get the whole project done. And frankly I did not want to wait for a couple hours for the glue to dry.

Cutting the Lid Free
With the box assembled now it’s time to cut the lid free of the bottom. This is easily done on the table saw but be very careful if you do this. I made three passes to cut all the way through raising the blade about quarter inch each time. On the last pass before the last cut I taped a 1/8 inch piece into the kerf to keep the rest of the box stable during the final cut.
[sanding]

Sanding and Routing
Once I had everything cut apart, I sanded all the surfaces and edges with 220 grit sandpaper. This removed all the pencil marks and any of the excess glue that might have squeezed out. And with that done I went ahead and used a 1/8 inch roundover bit in my router to round all the corners and edges both inside and out.


Finishing
Finishing this project was very straightforward. At one point I thought I wanted to use rattle can paint in white or something else. But I was in a hurry so chose to use an oil and wax finish. This is the same oil and wax finish that I use for all cutting boards and wooden utensils. The toolbox will never be out of the shop. So, an oil and wax finish will be perfect for this for me. All I did was rub it on wait a few minutes then polish off any of the excess. It darkened the wood really nicely and I really like the finish.

Final assembly
There’s a few last things to do to finish this box up. That is to apply hinges and a catch. The hinges that I used were salvaged from a cigar box and worked perfectly. They are 90° hinges, so the lid opens and stays open and doesn’t flop around. Plus, they didn’t cost me anything. As far as the catch, I’m not certain. The hinges are silver and the snap latch that I have are brass. Also, those snap latches are spoken for on a different project. For the moment there is no latch. I may add that later.
All in all this is a really great project that went together very fast and it’s serving a great purpose in my shop. Because it has a flat top I can stack things on top of it it’s small enough that I can stash on the shelf and it’s easy to open and easy to access.

Hope you got something out of this and if you did, do me a favor, hit like and subscribe. I’d appreciate that a lot.
Thanks for reading and until next time Good Making!
Bill
Visit my Etsy Store at https://www.etsy.com/shop/30MinuteWoodshop
And Follow on Social
Facebook https://www.facebook.com/30MinuteWoodshop
Instagram https://www.instagram.com/bill_berklich/
Pinterest https://www.pinterest.com/30minutewoodshop/
Links to my Videos and Blogs
6 Tools to Start Woodworking https://30minutewoodshop.com/?p=3391
Create Your Own Dice Vault https://30minutewoodshop.com/?p=1226
DIY Whiskey and Cigar Butler https://30minutewoodshop.com/?p=550
Farmhouse Key Rack https://youtu.be/I65FGq4dKYY
Create Your Own Lazy Susan https://30minutewoodshop.com/?p=491
Tools and Materials you may need
Milwaukee M18 Fuel 2-Tool Combo KIT https://amzn.to/4l7vAsc
Milwaukee’s M18 Compact Router https://amzn.to/4oh0pxm
Milwaukee M12 Detail Sander https://amzn.to/46I6tss
Milwaukee M12 Rotary Tool https://amzn.to/4lDpz6Z
Milwaukee M18 Jig Saw Kit https://amzn.to/3FAWXsS
Bostitch Nailer and Compressor Combo Kit https://amzn.to/3HsfXO6
Kreg K4 Pocket Hole Jig https://amzn.to/45bxFgQ
Ridgid Oscillating Belt Sander https://amzn.to/45C3rTK
Starrett Combination Square https://amzn.to/3XpbrDN
BOSCH Compound Miter Saw https://amzn.to/421A1vl
Minwax Fast Drying Polyurethane https://amzn.to/3V5h0pO
PPE Gear
3M N95 PPE Mask https://amzn.to/3x4NGEu
ISOtunes Bluetooth Earmuffs https://amzn.to/3lpj1iA