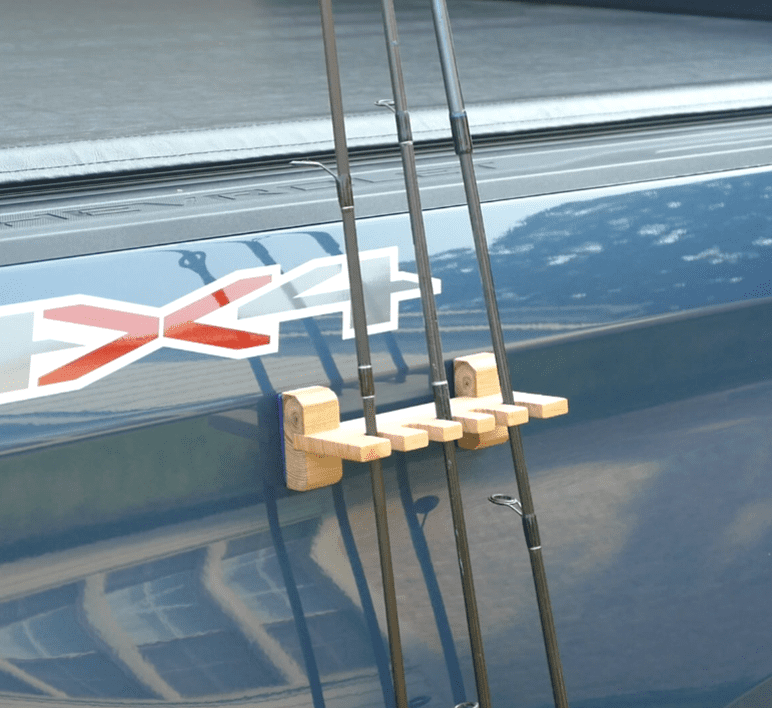

This is arguably the most important piece of fishing gear ever. And it’s so simple and easy, you can make it with hand tools. Now, like most people, I’m a fisherman but I’m a bank Fisher or dock Fisher. What that means is that I assemble my rods at my vehicle and usually lean them up against the fender. Of course, they slide off and sometimes hit the ground. While this isn’t a problem with steel rods or fiberglass rods the new graphite rods can be problematic. A small nick in a graphite rod is a stress riser and if you’re fighting a big fish or a lively fish there is a possibility of the rod failing at that point. So this little DIY rod rest we’ll keep your rod upright and out of the dirt.
Tools and Materials
The material that I recommend for this DIY rod rest is Western Red Cedar. You can, of course, use any wood you choose but western red cedar is very lightweight so you can minimize the magnets you need to hold it against the Fender. The other materials you’re going to need are the magnets. In my case I used four 8mm by 2mm rare earth magnets. You may need more or less depending on the size of the rod rust you were making.

As far as tools you can do this completely with hand handsaw, chisel, and a drill. I used a bandsaw, table saw, and a radial arm saw mostly because I have these tools and it makes it fast and easy.

Layout
I’ve provided the sketch below for a rod rest that will hold 5 fishing rods. The holes are 1/2 inch but you can use any size that’s appropriate to your rods.

Cutting
First, be sure that you read and follow all safety directions for all tools that you’re using. I had some leftover quarter inch that I sized to the correct width on my table saw again this is a good hand tool opportunity.

I continued cutting add meeting groove with my table saw it is support. Then I used the radial arm saw to cut all the pieces to length.

I drilled a series of half inch holes at one inch intervals as the basis for the rod rest. With that done I cut out the slots on the bandsaw and clean them up with sandpaper and a file. This is a great place to use a hand saw especially if you have a dovetail saw.


Drilling and Magnet Installation
Next, I clamped the support in place and drilled two pockets in each to fit the 8mm by 2mm rare earth magnets.

With the pockets drilled I used to clamp to seat the magnets flush. Then I added a bit of CA glue to hold them in place.


Sanding
I sanded all the edges and corners and surfaces with 220 grit sandpaper just to make sure the edges were broken and soft.
Assembly
Assembly was fairly simple, I just used CA glue to secure the support to the rest. You can of course use a waterproof glue such as Titebond 3.

Finishing
Finishing was a matter of wiping on boiled linseed oil. I chose boiled linseed oil for this project because it will not be outside in the rain generally it will be on the side of my vehicle while I’m assembling my rods back in the vehicle and then taken out so it will only be outside in the sun for a few minutes every time I finish. You may want to choose a hard year finish like a varnish or paint.

the last step in this project was to add a bit of felt to the back of each support to cover the magnets and keep from scratching my fender.

Let’s go fishing
Well this is an absolutely phenomenal little project. It’s quick and easy to do and we’ll save you a lot of effort while you’re doing your rod assembly and rigging.

If you do make this project, congratulations on a job well done. And do me a favor and post it on my Facebook page (see link below).
Hope you got something out of this and if you did, do me a favor, hit like and subscribe. I’d appreciate that a lot.
Thanks for reading and until next time Good Making!
Bill
Visit my Etsy Store at www.etsy.com/shop/30MinuteWoodshop
Facebook https://www.facebook.com/30MinuteWoodshop
Links to my Videos and Blogs
Create Your Own Dice Vault https://30minutewoodshop.com/?p=1226
DIY Whiskey and Cigar Butler https://30minutewoodshop.com/?p=550
Farmhouse Key Rack https://youtu.be/I65FGq4dKYY
Create Your Own Lazy Susan https://30minutewoodshop.com/?p=491
Tools and Materials you may need
DEWALT Drill and Driver Combo https://amzn.to/42yybmy
DEWALT Router Plunge Base Kit https://amzn.to/3LKkJEK
Ridgid Oscillating Belt Sander https://amzn.to/45C3rTK
Starrett Combination Square https://amzn.to/3XpbrDN
WoodRiver Low Angle Block Plane https://amzn.to/3pkNvos
Milwaukee M18 Jig Saw Kit https://amzn.to/3FAWXsS
BOSCH Compound Miter Saw https://amzn.to/421A1vl
Minwax Fast Drying Polyurethane https://amzn.to/3V5h0pO
PPE Gear
3M N95 PPE Mask https://amzn.to/3x4NGEu
ISOtunes Bluetooth Earmuffs https://amzn.to/3lpj1iA


