
My wife picked up set of twenty-four 3 x 3” Advent boxes for Christmas. She’s excited to give them to our granddaughter but they need a chest to sit in. And of course she asked me to make one. This actually turned out to be a fun, easy, and simple Christmas Advent Chest that even you could build. It does however require that you build the deep lap jig. Having the jig really turns this into a 30 minute project. So make sure you check out that particular blog and the video to see how it’s done.
Tools and Materials
First you’re going to need a set of advent calendar boxes. I put a link to a set of boxes below. With regard to lumber, almost all 30 Minute Woodshop projects start with surfaced and dimension lumber. Specifically, I chose to use Poplar which came in both ¼” and ½” thicknesses 3-1/2 inches wide by 48 inches long. You will need two of the half inch pieces and 4 of the quarter inch pieces. This will give you enough material to have a at least one or two spares and material for your setups.

Tools here are pretty straightforward too. You will need a table saw, and a dado blade. The dado blade I chose to use is a Freud 8 inch Super Dado Set (link below). This data set is absolutely great it gives you nice consistent width dados which are flat bottomed.

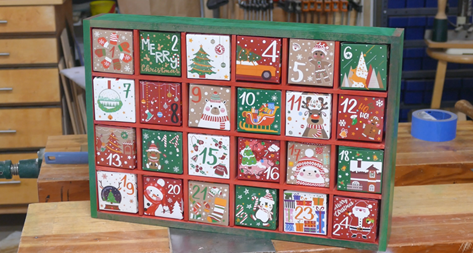
I found the one’s my wife bought!
24 Pcs DIY Christmas Advent Calendar Boxes https://amzn.to/4pC4ig6
24 different Christmas designs with the classic Santa Claus, reindeer and snowflakes on the surface(1 of each style) https://amzn.to/4pC4ig6

Layout
There’s a lot of precision layout needed for this particular project though it’s all pretty easy and straightforward. All the layout will occur as we make our cuts.

[layout]
Cutting
SAFEETY NOTE: OK before you start cutting here is a safety tip. Make sure you read and follow all safety directions for all tools. Also make sure you have a good set of eye protection and a good set of hearing protection.
Christmas is just around the corner so don’t be bashful, ask for a set of ISOtunes, you will love them. I put a link in the bottom so you can tell your better half to get you a pair.

So the first cuts you want to do are going to be to rip all the 3 1/2 inch pieces down to three inches. Be sure that when you do this you are precise in your measurements.

Your next step is going to be to layout both the sides, top and bottom, and the horizontal and vertical dividers.
I suggest you lay these out as you cut them again for precision. Once you’ve completed your cuts stack the complementary pieces together it makes sure the ends, both ends, match.


Cutting the Deep Lap Dados
Now is the time to employ the Deep Lap Dado Jig. In case you missed it I have put a link at the bottom to the blog. Install your dado set and raise the blade to 1 1/2 inches. 2 tricks to doing this 1st add a piece of printer paper between the two Dado blades. This will make the cuts a hair wider which make assembly slightly easier. Next raise the blade about an additional 64th of an inch. These two tweaks should compensate for any variations in thickness or width.

Next mark the inside edge of your first dado at exactly 3 inches. Set this mark on the edge of the cut in the jig and make sure the first tooth falls exactly on that line. You will repeat this process for every additional Dado you cut. Here’s another tip, stack your pieces so you cut all of them the same. And mark one end of the stack. This will be important during assembly

Sanding
With everything still in pieces, now is the time to sand. Use your orbital sander and 220 grit sandpaper and seeing all the surfaces and edges.

Finishing
With the sanding done now is the time to apply any finish that you think you need to. I painted the inside Brad and the outside green. Taped off all the points in places where glue would be applied to ensure a good glue joint bond.
I used rattle can spray paint to spray all the parts but suggest however that you may consider using a sanding sealer before you spray paint. The Poplar absorbs a lot of paint. So I had to apply several coats whereas if you use sanding sealer with a light sanding you could get away with one or possibly 2 coats. Be sure you let the paint dry thoroughly before you flip them over to paint the other side.

Assembly
The first thing you’re going to assemble are the dividers. These should go together very easily or at least somewhat easily. Put a drop of glue on the inside of each one of the dados. You won’t be very much this is really just to hold everything in place. Next you’re going assemble the case so peel off any tape and apply glue. Then fold the edges together put a clamp in place and make sure that the edges are flush. This is very important if the edges are not flush and square you will not be able to insert the dividers. With everything set put 3 nails in each edge on each side.

With that all done your dividers should slide into the case without too much trouble. Slide the dividers in halfway and then add a very small amount of glue across from each divider so that when you push it in that glue will glue about half of the divider into the case. This will provide some structure and make the case and divide or set solid.

At this point if you want to cut and apply a back that would be fine. I did not do that for two reasons one is I made this exactly 3 by 3 so the only way to get the little boxes out is to push them out from the back. So I left the back open. You could apply back and drill a hole in the center of each of the cubbies so you can stick your finger in from the back or you could glue in a piece of ribbon on top so when you push the box in the ribbon will hang out in front at the bottom either way will work. But, I have a 20 month old granddaughter and she won’t be able to use that. This should be much easier for her.
[assembly]

Project Complete
Well I have to say this was a fine project it was fast, it was easy, and it was fun. This is a project that I think will bring great joy to my granddaughter as well as my wife and my daughter. I think it may end up being a highlight for the next few Christmases.
The beauty of this project is that once the boxes wear out I can make small drawers. I can also put it back on at some point and I can put doors on it. Those of course are all projects for the future.

Hope you got something out of this and if you did, do me a favor, hit like and subscribe. I’d appreciate that a lot.
Thanks for reading and until next time Good Making!
Bill
Visit my Etsy Store at www.etsy.com/shop/30MinuteWoodshop
Facebook https://www.facebook.com/30MinuteWoodshop
Links to my Videos and Blogs
6 Tools to Start Woodworking https://30minutewoodshop.com/you-need-these-6-tools-to-start-woodworking/
Create Your Own Dice Vault https://30minutewoodshop.com/?p=1226
DIY Whiskey and Cigar Butler https://30minutewoodshop.com/?p=550
Farmhouse Key Rack https://youtu.be/I65FGq4dKYY
Create Your Own Lazy Susan https://30minutewoodshop.com/?p=491
Tools and Materials you may need
24 Pcs DIY Christmas Advent Calendar Boxes https://amzn.to/4pC4ig6
Milwaukee M18 Fuel 2-Tool Combo KIT https://amzn.to/4l7vAsc
Milwaukee’s M18 Compact Router https://amzn.to/4oh0pxm
Milwaukee M12 Detail Sander https://amzn.to/46I6tss
Kreg K4 Pocket Hole Jig https://amzn.to/45bxFgQ
Ridgid Oscillating Belt Sander https://amzn.to/45C3rTK
Starrett Combination Square https://amzn.to/3XpbrDN
Milwaukee M18 Jig Saw Kit https://amzn.to/3FAWXsS
Minwax Fast Drying Polyurethane https://amzn.to/3V5h0pO
PPE Gear
3M N95 PPE Mask https://amzn.to/3x4NGEu
ISOtunes Bluetooth Earmuffs https://amzn.to/3lpj1iA


