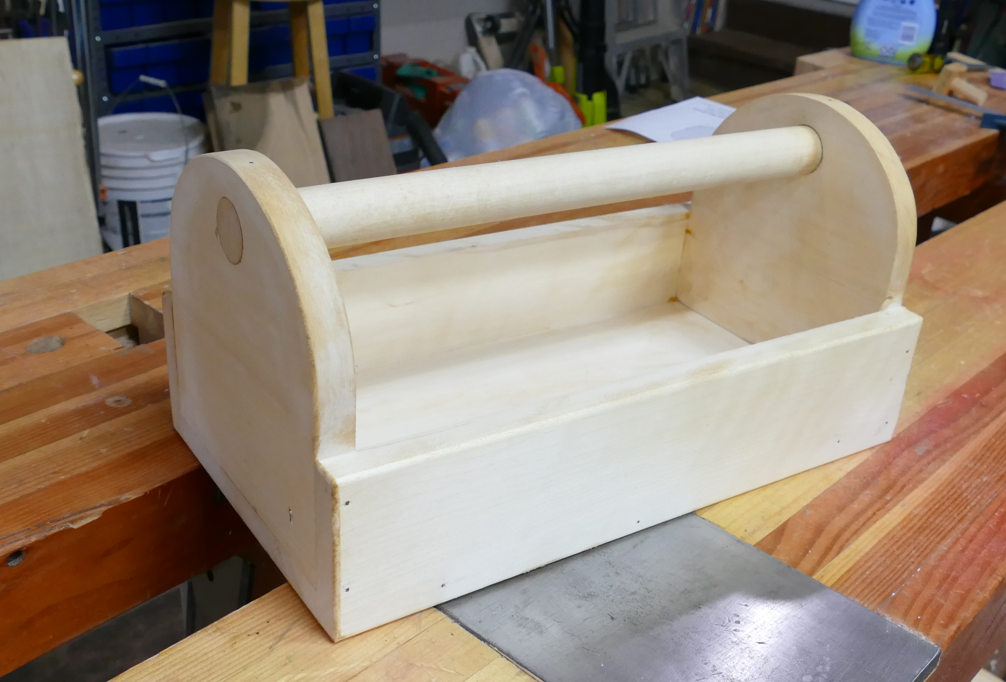

Here is an easy to build Handy Tool Tote that is perfect for beginning Woodworkers. And this project is really useful around the house. Winter’s coming and I’ve been upstairs making some repairs to the windows and doing some minor plumbing and electrical work. This usually requires me to go up and down the stairs 20 times fetching different tools which all end up upstairs. Then I have to cart them all back downstairs. This little tool tote is designed specifically for these kinds of jobs. I can drop in a hammer screwdriver a few wrenches utility knife and those kinds of things cart them upstairs in one shot and do the same thing going back down. I’m hoping this cuts down the number of trips Up and down the stairs.
This is a beginner project so it’s very easy to do and very fast.

Tools and Materials
I started out with some Aspen for this Tool Tote but you can use Pine or get really fancy and use Maple, Oak, or Walnut. You will need three 16 inch long pieces of 1×8 and a 16 inch long 1″ diameter dowel.
Tools are straightforward you’ll need a saw a jigsaw or bandsaw if you’re going to make the end round but you could just as easily cut a pair of 45s and then you wouldn’t need the jigsaw You’ll also need a hammer and some nails. You can add some glue to this too, but it’s not needed. Add in an orbital Sander and some sandpaper like 220 grit.
If you choose to make the ends round like I did you’ll probably need a set of trammel points or a very large compass. I used a set of trammel points by Wood River, there is a link below.

Layout
Layout couldn’t be more simple, you’re going to cross cut all three pieces to 16 inches then you’ll take one piece and mark it to be cut in half lengthwise at about 3-1/2” wide. Then take a second piece and cut it in half so each piece is about 8 inches long. The remaining piece is going to be the bottom.

Cutting
Crosscut your first piece at 8 inches and make sure the pieces match. Take your second piece and RIP it into two 3 1/2 inch pieces.

Laying out the ends.
With your ends cut next you’re going to want to layout the arcs on the ends. For this you need a set of Trammels. Follow the directions included with trammels and set them to 1/2 the width of the end. That is about 3-11/16 inches, But make sure you check because you’re 1×8 may be more or less than the 7-3/8” that mine is.
Cutting the arcs
Now is the time to cut your arcs. I used a bandsaw. But this is a perfect opportunity to use a jigsaw. Be sure to follow close to the line but not to go over. Leave yourself a 16th or less because you’re going to sand down to the line.
To make sure that this process leave you with two identical pieces your best bet is to use two face tape and tape both pieces together. This will pretty much ensure that you have identical pieces.

Fairing the curve
With your pieces still taped together you’re going to fair the curve. This means you’re going to sand out any roughness divots or little woogies that may be there from the cutting operation. I used a rigid oscillating Sander which made very short work of this. But you could use an orbital Sander with 80 grit and then follow it up with 220 grit. Be sure you have does collection though because you will make a lot of dust.

Drilling the handle hole
The next step in the process is to drill the handle holes. I used a 1-1/4 inch spade bit because my handle diameter was 1 1/4 inches. Mostly because that’s the size of dowel that I had on hand. You’re going to be using a 1″ diameter dowel so choose a 1 inch spade bit and with both pieces still taped together drill your holes. Be sure that you’re very careful and the drill is perpendicular to the workpiece. Sometimes this is very difficult because the drill may tend to wander around a bit. If the holes are not perpendicular the handle’s not going to fit properly or it’s going to look really wonky. Actually this is a good place to use the drill press.

Sanding
Now is the time to sand all your parts with 220 grit sandpaper you said orbital Sander and make sure you send out all surfaces.

Assembly
And its assembly time. Grab your glue, hammer, and nails and lay your parts out in the order of assembly. If you drilled the holes properly they will be a very tight fit. So what you’ll want to do is glue and nail the one end and sides and insert the handle. Then apply glue to the other end and slip it in and seat the handle. And of course drive the nails. You should also put one nail in the handle from the top. This really only needs to be an 1-1/4 inch brad. I used an air nailer for this process because it’s far faster and easier.


Finishing
You can choose your finish on this project. I chose to use Johnson’s paste wax just to give it a little bit of color and a little bit of protection. This is an inside tool tote so I don’t suspect it’s going to see any kind of significant weather, water, or sun.
I don’t think Johnson makes the paste wax anymore but there are several other kinds of paste wax you can use like Minwax Finish Wax (link below)

With the pace works on the projects finished and I have to say it was a fast easy and fun project to put together and when it’s done it looks really good. I hope you take the time to knock this project together because I think it will be one of those things that you will use regularly and frequently as you work around the house. And it will make your life easier.

If you do make this project, congratulations on a job well done. And do me a favor and post it on my Facebook page (see link below).
Hope you got something out of this and if you did, do me a favor, hit like and subscribe. I’d appreciate that a lot.
Thanks for reading and until next time Good Making!
Bill
Visit my Etsy Store at www.etsy.com/shop/30MinuteWoodshop
Facebook https://www.facebook.com/30MinuteWoodshop
Links to my Videos and Blogs
6 Tools to Start Woodworking https://30minutewoodshop.com/you-need-these-6-tools-to-start-woodworking/
Create Your Own Dice Vault https://30minutewoodshop.com/?p=1226
DIY Whiskey and Cigar Butler https://30minutewoodshop.com/?p=550
Create Your Own Lazy Susan https://30minutewoodshop.com/?p=491
Tools and Materials you may need
Woodstock Trammel Set https://amzn.to/48f1JuG
DIY Adjustable Trammel Point Kit https://amzn.to/47XEyn8
Minwax Finishing Wax https://amzn.to/3XzFysQ
Milwaukee M18 Fuel 2-Tool Combo KIT https://amzn.to/4l7vAsc
Bostitch Nailer and Compressor Combo Kit https://amzn.to/3HsfXO6
Ridgid Oscillating Belt Sander https://amzn.to/45C3rTK
Starrett Combination Square https://amzn.to/3XpbrDN
Milwaukee M18 Jig Saw Kit https://amzn.to/3FAWXsS
BOSCH Compound Miter Saw https://amzn.to/421A1vl
Minwax Fast Drying Polyurethane https://amzn.to/3V5h0pO
PPE Gear
3M N95 PPE Mask https://amzn.to/3x4NGEu
ISOtunes Bluetooth Earmuffs https://amzn.to/3lpj1iA


