
I head over to my friend’s house about once a month to drink good bourbon and smoke cigars. I do that of course because my wife doesn’t really want me smoking them at home which I understand completely. But most of the time if I’m not smoking his cigars I’m bringing mine over in a plastic bag. I decided I wanted to transport these in something other than just a shopping bag. So here’s a classy travel case for your cigars and that’s pretty easy to build.
Tools and Materials
The materials I chose for this particular project were Walnut and Mahogany. The Walnut is from my brother-in-law’s place. He had taken down a walnut tree, slabbed it, and air dried that for about 10 years. The Mahogany was leftover from another project. You of course can use any wood you feel like but I think it would look really nice in Cherry and Maple.

Tools in this project this project can be done completely with hand tools. However I do recommend power tools. And to start with I would recommend a compound sliding miter saw. This will get you super accurate 45 degree angles for the corners. You probably could use a good table saw also to create the rabbits unless you wanted to do that with a rabbeting plane. And a couple of 8mm magnets, an 8mm drill bit, a drill, screwdriver, and glue. And of course finish, I suggest lacquer.

Layout
I used a table saw to cut the 40 fives. I started with pieces that were laid out slightly longer than what I needed for the sides and the ends. My objective here was to build the box That seemed like the easiest way to do it. And then cut the lid off the bottom.


Cutting
I crosscut the front the back and both sides on my radial arm saw just a bit longer than what I needed.

More Cutting / Planing
I set the table saw blade at 45° using a Wixey digital angle meter. Then I lined up the blade and put a stop on my miter gauge fence. This ensured repeatable cuts. With that done I proceeded to cut the parts
With all the parts cut I reset the saw for a 1/8 inch deep and 1/4 inch wide dado on all the pieces both top and bottom. I did this because that wasn’t the design feature that I wanted. Many times with these types of boxes the tops are flush.


Sanding
This is a perfect time to sand. And I sanded all the parts inside and out using 220 grit sandpaper to make sure everything was nice and smooth before glue-up.
Assembly
To assemble the to assemble the box I applied glue to all the corners applied a strap clamp. I kept it a bit on the loose side and then I apply glue in the dados and fit both the top and the bottom. With those in place the strap clamp I screwed down and left the assembly for about 3 hours to dry.

Cutting the Top Free
once the glue was dried and set the blade to cut just a bit over the thickness of the sides. Then I made the four cuts To free the top from the bottom.

Edge Routing
Because I wanted this to be more like a wallet than a box I rounded all the edges top and bottom using a 3/4 inch roundover bit. look This very pronounced roundover gave the box a character and look more like a wallet
Final Sanding and Finishing
I did a final sanding with 220 grit to knock down all the sharp edges and then went back with 320 grit to make sure everything was ultra smooth. With the sanding complete I grabbed A rattle can of lacquer 6 coats. Gave the project Both inside and out. I use 320 grit Between the third coat and the fourth coat and between the 4th coat and the 5th coat of lacquer.

Installing the Hinges and Magnets
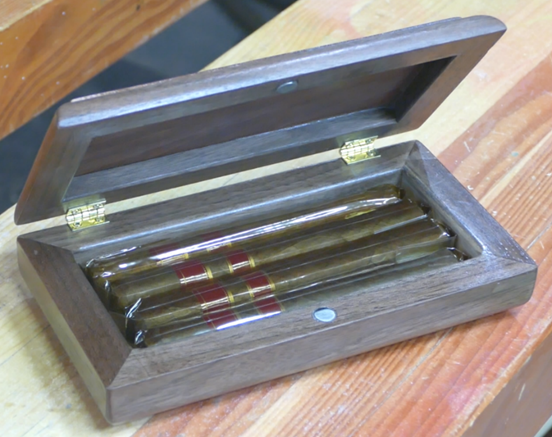
Final assembly was positioning and drilling two 8mm holes for the two 8mm magnets positioning and screwing down and both of the hinges. The hinges were a bit tricky because driving those tiny brass screws into Walnut almost always ensures they will break if you don’t put a pilot hole in. So based on my screw size I used a 3/32 inch down about an eighth of an inch and then carefully drove the screws.

Well this was a pretty cool project. And relatively fast. It was easy to do Choosing the lacquer helped in dry times. Insured And it also that there wouldn’t be any funny taste to the cigars. This cigar travel case works out perfectly for me and will carry four of my Rocky Patels next time I go visiting.

Hope you got something out of this and if you did, do me a favor, hit like and subscribe.
Thanks for reading and until next time Good Making!
Bill
Visit my Etsy Store at www.etsy.com/shop/30MinuteWoodshop
Facebook https://www.facebook.com/30MinuteWoodshop
Links to my Videos and Blogs
Create Your Own Dice Vault https://30minutewoodshop.com/?p=1226
DIY Whiskey and Cigar Butler https://30minutewoodshop.com/?p=550
Create Your Own Lazy Susan https://30minutewoodshop.com/?p=491
Tools and Materials you may need
Milwaukee M18 Fuel 2-Tool Combo KIT https://amzn.to/4l7vAsc
Milwaukee’s M18 Compact Router https://amzn.to/4oh0pxm
Starrett Combination Square https://amzn.to/3XpbrDN
Milwaukee M18 Jig Saw Kit https://amzn.to/3FAWXsS
Minwax Fast Drying Polyurethane https://amzn.to/3V5h0pO
PPE Gear
3M N95 PPE Mask https://amzn.to/3x4NGEu
ISOtunes Bluetooth Earmuffs https://amzn.to/3lpj1iA