
I have a small branding iron that needs a home. It’s for Chippewa Chapter of Mishigami Lodge Order of the Arrow. IYKYK. So I thought I’d build a chest for this branding iron. Nothing fancy but something rustic. I came up with a chest that’s all butt joints and uses reclaimed wood. With that I also included leather hinges and a leather strap for a catch. I’ll put some things in the bottom for regular hinges and a latch in case you want to go that route.
And follow this link to my Video to see how it is done.
Tools and Materials
As I mentioned this is using recycled material. One of the local lumber yards closed down about 18 or 19 years ago and still in the shed on the property was a fair amount of knotty pine. I was able to salvage some for a series of projects. Though I have to say my store is running low.

As far as tools, this can be totally done with hand tools and all you really need is a hand saw a hammer and nails. I happened to use my radial arm saw and my table saw just to do the job a little bit quicker. Oh and I did use a hammer.

Layout
Layout of super easy this is just a chest with butt joints so all you have to do is mark all the parts so you can cut them to width and cut them to length.

Cutting
And cutting is just as easy. You need to cut your wood to width, usually on a table saw but you could use a hand saw, And of course cross cutting to the length. You need a compound miter saw or a radial arm saw works wonders too. But you can also use a handsaw. Set your table saw fence to the widths shown in the sketch and rip your boards down. Or, you can just adjust the size to use common 1 x 6.
Set up your Radial Arm Saw or Compound Miter saw for the crosscuts.


Assembly
With all your parts cut out, assembly is super easy because this is done with butt joints, nails, and glue. Because of the size of this chest you probably don’t have to worry too much about it being square As long as the cuts were square then the chest will go together square and you won’t have to do anything. Just apply glue, make sure that all the pieces are flushed and drive your nails. I used a Bostitch 18ga Nailer with 1-1/2” nails.

Sanding
Now is the time you want to sand. I use my orbital Sander with 220 grit sandpaper and sanded the outside of the chest, all the edges, and sanded the top. Additionally, I have a small Milwaukee Orbital Detail Sander that I used to soften all the corners. You can do this with a piece of hand sandpaper and maybe a file if you want to.

Finishing
I know where this probably is going to be so I decided not to put on a heavy finish. I use boiled linseed oil just to give it a little bit of protection. It will generally be spending its lifetime either in someone’s closet or possibly in a trailer. So, protected from the elements. Therefore it doesn’t really need a very heavy finish. I wiped on the boiled linseed oil let it soak in wiped off any excess and then I let it cure for a day.

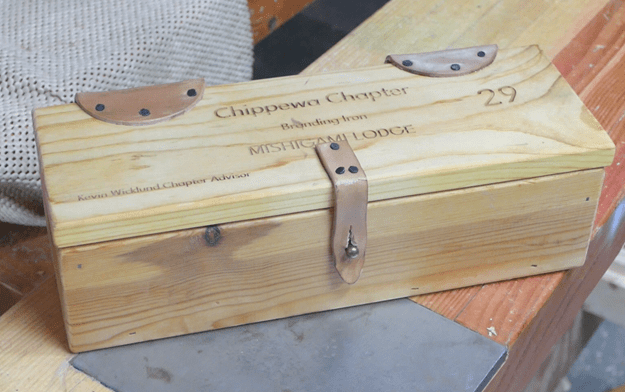
Leather Hinge Install
With all of that done it’s time to install the hinges. If you’re using standard hinges go ahead and screw them down now and the same goes for a standard latch. There’s a link at the bottom for those. However I decided to use something different. I decided to use leather for the hinges. I had a couple of three-inch leather rounds laying around and thought those would be perfect as hinges. I wetted the leather and then clamp him over a 90° angle form. Once they dried, the hinges were permanently set at 90°. With that done I applied some brown shoe polish and rubbed it in well just to give it a bit of an antique look.
To fasten these leather hinges in place I used contact cement. By applying some contact cement on the leather and then on the wood also and then letting it dry till it’s tacky you create what is effectively a permanent bond. I did want to add some decoration to this so I added this series of carpet tacks around the edge of each of the pieces of leather and those also double as a mechanical fastener for the hinge itself.
It does look pretty slick with the leather hinges.
For the latch, I used was a piece of three-quarter inch by 4 inch long leather with a hole. And then I screwed in a stud.


I have to say this is was an absolutely great project and I had a lot of fun doing it. It went together very quick and easy. I will say that leather hinges were more problematic than I anticipated but they still worked out and they look really good.
A couple of notes though, be sure you use waterproof glue if this is going to be outside for any length of time. Knowing this is going to be around a bunch of Boy Scouts I used waterproof glue.

Hope you got something out of this and if you did, do me a favor, hit like and subscribe. I’d appreciate that a lot.
Thanks for reading and until next time Good Making!
Bill
Visit my Etsy Store at www.etsy.com/shop/30MinuteWoodshop
Facebook https://www.facebook.com/30MinuteWoodshop
Links to my Videos and Blogs
Create Your Own Dice Vault https://30minutewoodshop.com/?p=1226
DIY Whiskey and Cigar Butler https://30minutewoodshop.com/?p=550
Farmhouse Key Rack https://youtu.be/I65FGq4dKYY
Create Your Own Lazy Susan https://30minutewoodshop.com/?p=491
Tools and Materials you may need
Jewelry Chest Hinge and Latch Set https://amzn.to/4ok0tfG
Leather Coasters https://amzn.to/3Ubzcyo
Milwaukee M18 Fuel 2-Tool Combo KIT https://amzn.to/4l7vAsc
Milwaukee’s M18 Compact Router https://amzn.to/4oh0pxm
Milwaukee M12 Detail Sander https://amzn.to/46I6tss
Bostitch Nailer and Compressor Combo Kit https://amzn.to/3HsfXO6
Bostitch 18 GA Brad Nails (900) https://amzn.to/3Hopnu4
Kreg K4 Pocket Hole Jig https://amzn.to/45bxFgQ
Starrett Combination Square https://amzn.to/3XpbrDN
Milwaukee M18 Jig Saw Kit https://amzn.to/3FAWXsS
BOSCH Compound Miter Saw https://amzn.to/421A1vl
Minwax Fast Drying Polyurethane https://amzn.to/3V5h0pO
PPE Gear
3M N95 PPE Mask https://amzn.to/3x4NGEu
ISOtunes Bluetooth Earmuffs https://amzn.to/3lpj1iA


