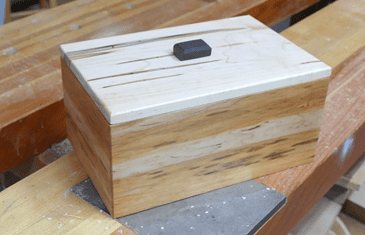

Sometimes you just need a box. Here’s a simple lift lid box with mitered joints that looks good and can be sized to whatever dimensions you need. I made this box to replace an old ceramic bowl we’ve been using to hold our receipts. My wife was tired of it and didn’t like that everyone could see a mash of receipts on the counter.
This box is a perfect answer. And I built it around a piece of salvaged Spalted Maple. That combined with the Gummy Cherry really makes for a striking box.
Tools and Materials
I’ve had this 11” by 7” piece of Spalted Maple I salvaged and have, for a long time, been looking for a project to use it in. This Lift Lid Box turned out to be that perfect project. Similar, is the Cherry I used for the sides. It was a piece I salvaged from an old Cherry headboard, which turned out to have more character than was evident from just seeing the finish. I also had a bit of 1/4 inch plywood for the bottom.

You can, of course, choose you wood and like me possibly size your box around your material.

This project like most all of mine could be done with hand tools and this one would definitely be a “skill builder” cutting and fitting the miter joints. I used my Table Saw, Radial Arm Saw and an Orbital Sander.
Other tools I use were a Wixey Digital Angle Guage, a Delta Tenon Jig, a band clamp, and a set of set up bars – links at the bottom.
Your First Cut…is a Groove
The first thing you need to do is to make a groove for the bottom. Doing it now ensures that the groove is identical across all of your parts. Use your setup blocks to set your fence 1/8” away from the blade and set the blade ¼ inch high.

Make your first pass then move the fence away from the saw blade by 1/8” then make a second pass. Check the fit of the bottom and you may find you need to make a third pass of just a hair to open it enough for the bottom to fit snuggly.

Layout
No layout per se for this project. Just where you will crosscut. So mark the length of your pieces and don’t forget to account for the blade thickness.

Crosscutting
Cross cut your pieces to length. (I said this was easy)

Cutting the Miters
To cut your miters, the frst this is to set your blade to 45 degrees. Accuracy here is a critical step and is usually what causes the most heartache. Use a Wixey Digital Angle Guage! (see link below) It will save you a ton of time and grief trying to dial in the angle.

Next set your Miter Fence to 90 degrees (use the Wixey for this too) and add a stop block so that your parts are identical. Now cut away!

More Cutting
With all the parts cut, now it’s time to dry fit and then cut and fit the bottom. It’s a pretty simple operation. Partially assemble the box and measure from groove to groove. Then cut the bottom about 1/16th of an inch less. Be sure you reassemble with the bottom in place, just to make sure that you cut correctly. You don’t want to be going into assembly and discover it’s the wrong size.
Sanding
Let’s get busy sanding. Grab your orbital Sander and you can start with 220 grit. Give all sides a very nice sanding. That includes the insides too. Then switch over to 320 grit and do it all over again. Be sure to take sandpaper to all the edges top and bottom and inside and out. This will soften everything up and give it a really nice look. Do not sand the mitered edges.

Assembly
Let’s get busy assembling the box. Lay the pieces out end-to-end with the inside facing down. Be very precise when you line up the pieces. Next, use some blue painter’s tape and tape everything down. Flip the assembly and apply glue to all the joints. Because you’re gluing end grain, I would put on a coat of glue and then I would come back after about 2-3 minutes and put another coat of glue on. The grain will absorb a lot of the glue. With your glue on, stick the bottom in and close up the other three sides. At this point you can leave it as is, or you can use a band clamp, which is what I recommend. There’s a link in the bottom to a band clamp that you could use for this.

Cutting The Lid
With the box assembled and drying, next you want to cut the lid. Again, this is pretty easy, just measure the size of the box. And then take your lid piece and cut to fit. Here is the point where you can have a little bit of fun. You can make the top a little bit larger or a little bit smaller, or you can treat the edge by routing a Roundover, a Roman OG, or putting a chamfer on it. All these are kind of cool little features that you can do to dress up the box.
Cutting The Rabbets
With the lid cut, now you’re going to have to cut the recess or rabbets for the lid. Several ways you can do this. You can of course use a rabbeting plane, like a Stanley 78, you could also use a router though I think that’s kind of a clunky method or like me, you can use your table saw. The table saw is a very easy to use. All I did was set the table saw blade height to ¾ inch. I then used a delta tenoning jig, which held the piece vertically. And I cut away about 1/4 of an inch into the top. There’s a link at the bottom for Delta Tenoning jig, if you care to have one. It’s one of those tools that you don’t use all the time, but when you need it, you need it.

The Knob
The knob is another one of those fun things you can do to this box. My original intent was to use a piece of agate. For some reason I couldn’t find one that actually fit. So I chose to use a piece of walnut that had been cut to fit for something else, and it happened to fit this project perfectly. All I did was just to glue it on with some glue, not using any type of fasteners. The lid is pretty light, and I don’t anticipate it being used heavily so it didn’t need to be very much. You of course can use anything you want for a handle for your box. Whatever you choose, at least have some fun with it. Make it something that actually looks kind of cool and you can use really easily. And if you try something and you really don’t like it, you can take it off and put something different on.
Finishing
For me, finishing was very straightforward. I used boiled linseed oil and wiped it down a liberal coat then let it sit for about 5 minutes and rubbed it off. I applied two more coats. And let them cure in between for about 3 hours. Then I took a little bit of paste wax and gave everything a quick polish.

Project Wrap Up.
For me this lift lid box turned out to be the perfect project. It will meet our needs for stashing our receipts and it’s going to look really good on the counter.
I hope you take the time to make something like this for your home, because I think you’ll get a lot out of it, at least, if nothing else, in learning how to set up your tools and how to do precision work.

If you do make this project, congratulations on a job well done. And post it on my Facebook page (see link below).
Hope you got something out of this and if you did, do me a favor, hit like and subscribe. I’d appreciate that a lot.
Thanks for reading and until next time Good Making!
Bill
Visit my Etsy Store at www.etsy.com/shop/30MinuteWoodshop
Facebook https://www.facebook.com/30MinuteWoodshop
Links to my Videos and Blogs
Create Your Own Dice Vault https://30minutewoodshop.com/?p=1226
DIY Whiskey and Cigar Butler https://30minutewoodshop.com/?p=550
Create Your Own Lazy Susan https://30minutewoodshop.com/?p=491
Tools and Materials you may need
Delta Tenon Jig https://amzn.to/42QKoEs v
Wixey Digital Angle Guage https://amzn.to/4iIbILa
Rockler Band Clamp https://amzn.to/4iMlc82
15 PCS Gauge Setup Blocks https://amzn.to/42NjsXD
Ridgid Oscillating Belt Sander https://amzn.to/45C3rTK
Starrett Combination Square https://amzn.to/3XpbrDN
WoodRiver Low Angle Block Plane https://amzn.to/3pkNvos
Milwaukee M18 Jig Saw Kit https://amzn.to/3FAWXsS
BOSCH Compound Miter Saw https://amzn.to/421A1vl
Minwax Fast Drying Polyurethane https://amzn.to/3V5h0pO
PPE Gear
3M N95 PPE Mask https://amzn.to/3x4NGEu
ISOtunes Bluetooth Earmuffs https://amzn.to/3lpj1iA


