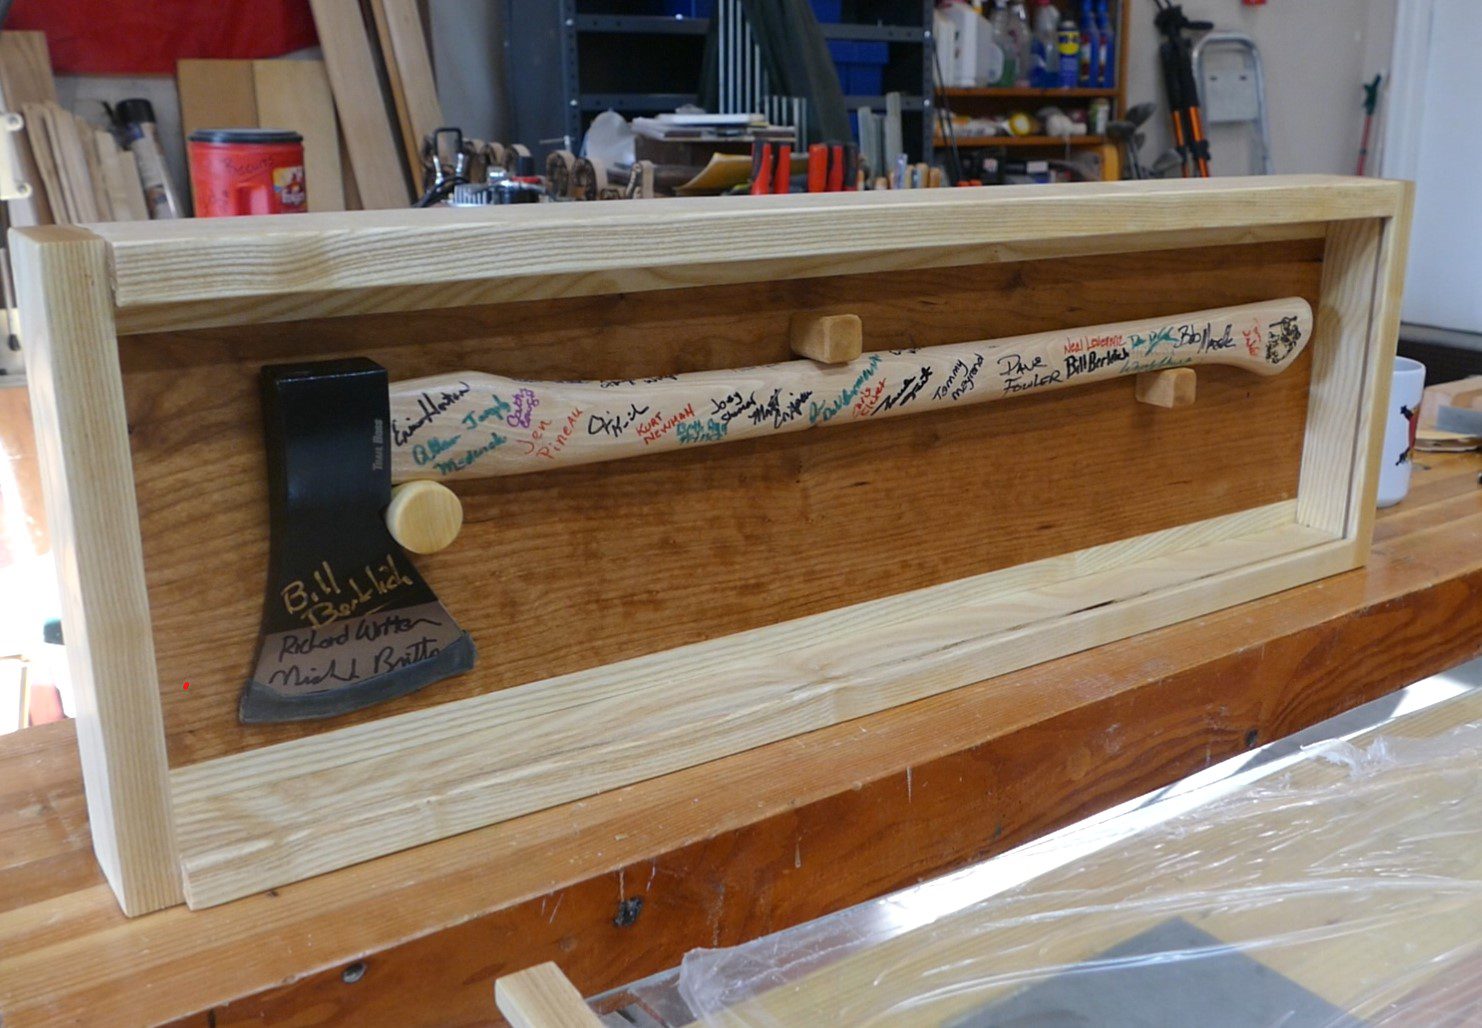
Well, not everyone needs an axe display case. But the beauty of this is it can be easily resized and used as a display case for a veteran’s flag and medals. I’m making this for a close friend that was given an autographed axe as a memento from his tenure as the Course Director for BSA Wood Badge (IYKYK). The project is fairly easy and though not really a 30 minute project it still can be done in less than two hours with the right tools.
Tools & Materials
Tools for this project are fairly straightforward you do need to have a way to cross cut the wood and a way to rip. So a table saw and radial arm saw are good choices. A compound miter saw might be another good choice for crosscutting. You will probably need the compact router with an eighth inch round over bit. And of course the usual tape measure, square, clamps, etcetera.
For materials I chose Cherry for the field (back) and Ash for the sides of the display case. I did this to make the axe more visible and to allow more light to reflect onto the handle. You will need some plexiglass and several French cleat hangers. There are links in the bottom to all these things.

Layout
Start by laying out the width of the field which is the back of the display case. I was using a piece of Cherry and had to add an additional two inches by gluing 1″ pieces of Ash to each side. This gave me a back width of 9 1/2 inches. To accommodate the axe length I needed 30 inches. You will probably need to adjust these dimensions based on the axe you’re using or if you are sizing this as a tribute case for a veteran’ flag and medals. Because I am using butt joints the ends are the same width as the back.

Material Preparation and Cutting
I used fairly raw material. Which means I had to mill the pieces to the correct dimensions. I started by running them through jointer. Then putting them through a planer and finally I cut them to width.

I suggest you use stock material which is 3/4 inch surfaced on four sides (S4S). Your first cut is to rip the back piece or field to 9 1/2 inches. My Cherry piece started at 7 1/2 inches and I had to add an inch to each side. This was just a matter of gluing an additional 1″ piece on each side. Next you’ll need to cross cut your piece to the correct length in my case that was 30 inches because my material is 1 inch thick. The drawing assumes 7/8 Inch thick material so you may need to adjust the dimensions if you’re using stock 3/4 inch material. With your back sized, rip the sides and ends to 3 inches wide. Crosscut The parts to the correct length. Be sure you check all your dimensions.

Making the groove
Now that your parts are cut, set your saw blade to 1/4 inch and 1/4 inch away from the fence run all the parts so that one face has a groove along the entire length. Move the fence right of 1/8 inch and run them through again which will give you 1/4 inch groove. Be sure to check that the plexiglass fits the groove.

Cutting the short end
One end of the display case will be full 3 inches wide. The other end, however, will only be 2 inches wide. As you have not moved the fence yet increase your depth of cut and run the piece through again. This will give you and then peace that is 2 inches wide and will mate exactly with the bottom of the rest of the grooves.
Assembly
Let’s start the assembly process for the display case. We are using butt joints all around, so this is very easy. We can use butt joints because the material is so thick. It offers an extensive glue surface. With this much glue area we really don’t need any additional fasteners. But you can put in screws if you so choose or use nails. They’re not, however, needed. Apply glue to all the surfaces and clamp everything in place. Be sure to match the grooves at the corners. If you don’t do this you won’t be able to slide the plexiglass in. Also be sure to clean up and clean out any squeeze out in the groove. Clamp everything up and wait a few hours.

Sanding
If you were very accurate in your initial milling of the parts everything should have gone together almost perfectly so you won’t have much sanding the two. If not, orbital Sander wear some 80 grit sandpaper and sand the edges and corners flush.

Cut the end piece
Now that the carcass of your display case is complete you need to create the end for the plexiglass. This is going to be a 1” wide piece 9 1/2 inches long. This will have a rabbit that is 1/4 inch wide by 1/4 inch deep To accommodate the edge of the plexiglass. Basically, if you look at the end, the cross section will be an L.
Making the plexiglass face
The next step is to cut the plexiglass size. You will have to measure from groove to groove right to left and then subtract 1/16th of an inch. If everything was done correctly you’re plexiglass should be 9 7/8” wide. Then crosscut to links again you’ll have to measure, and size based on your assembly. But it should be about 30-3/16 inches.

Remember measure twice cut once.
Now you’ll need to glue the plexiglass to the end piece. I used a gel super glue very sparingly. You can also use epoxy, again very sparingly. Once it’s dry you may need to do a little bit of work on the edges of the plexiglass. Take a file and chamfer all the edges and corners. This will make it easier to slide in and out.

Creating the axe supports
The last thing you need to do is to create support to hold the axe in place. I used a 1 inch dowel to support the head And carved away a bit so both the axe had and the handle we’re in set about 1/4 inch. Then I got two 1”X 1” X 2” Pieces of Maple chamfer the edges and use those to hold the axe handle in place. Take a look at my video to see exactly how that’s done. Just put a dab of glue on the bottom of each one and press them in place around the axe. These will need about two hours to dry.

Rounding the edges
With the case done at this point you can either sand the edges round or use a compact router and a 1/8″ round over bit to ease all the edges. Whichever you choose, make sure the sharp edges are all nice and smooth. Additionally, you can see in the entire carcass with 320 grit sandpaper just to ensure a nice smooth surface.

Finishing
You have a lot of finishing options. I chose to use boiled linseed oil. This is an inside project and really won’t see anything like heavy use or cups and glasses set on it. It is just going to hang on the wall. So I put two coats of BLO, then finished off with a good waxing and polishing.

Closing
So this was a great project. Even though I had to work through a lot on the design side because I have never made one of these, this display case turned out really well. The axe stays in place and can be easily removed. The plexiglass slides in and out smoothly and the finish is really nice. The axe against the cherry shows up very well. And with the ash sides it’s very easy to read all the names on the axe handle. I think my friend will be very happy when he receives this.

Hope you got something out of this and if you did, do me a favor, hit like and subscribe. I’d appreciate that a lot.
Thanks for reading and until next time – Good Making!
Bill
Visit my Etsy Store at www.etsy.com/shop/30MinuteWoodshop
Facebook https://www.facebook.com/30MinuteWoodshop
Links to my Videos and Blogs
Axe Display Case https://youtu.be/LFRrpUNiXck
Create Your Own Dice Vault https://30minutewoodshop.com/?p=1226
DIY Whiskey and Cigar Butler https://30minutewoodshop.com/?p=550
Farmhouse Key Rack https://youtu.be/I65FGq4dKYY
Tools and Materials you may need
French Cleat Hangers https://amzn.to/3X1fYMu
DEWALT Drill and Driver Combo https://amzn.to/42yybmy
DEWALT Compact Router Kit https://amzn.to/43HWWwU
Ridgid Oscillating Belt Sander https://amzn.to/45C3rTK
Rockler Brass Setup Blocks https://amzn.to/43nFhun
Narex Scratch Awl https://amzn.to/3O8sM
Milwaukee M18 Jig Saw Kit https://amzn.to/3FAWXsS
BOSCH Compound Miter Saw https://amzn.to/421A1vl
Minwax Spray Lacquer https://amzn.to/3IXOIIV
Titebond III Ultimate Wood Glue https://amzn.to/3Nb4i6n


